Monte Carlo Integration
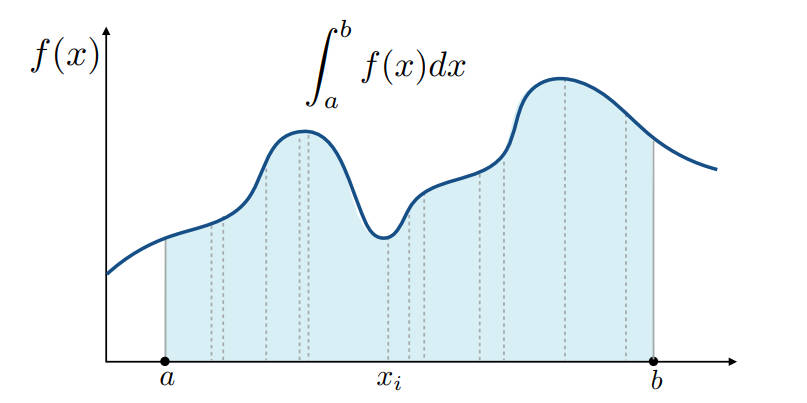
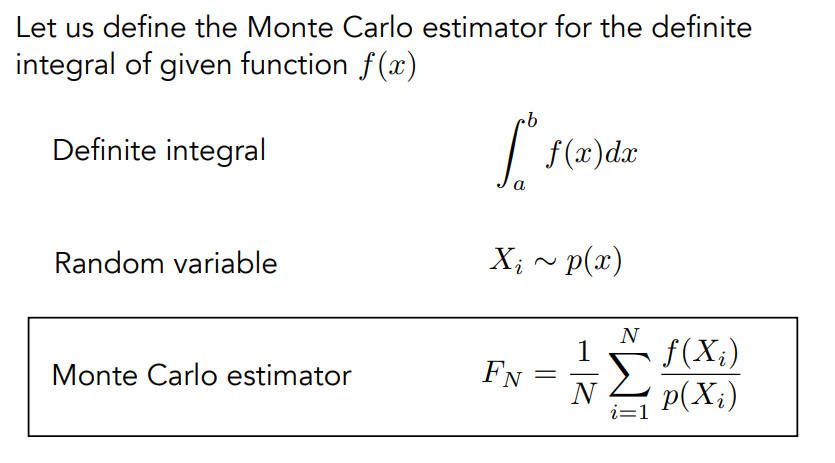
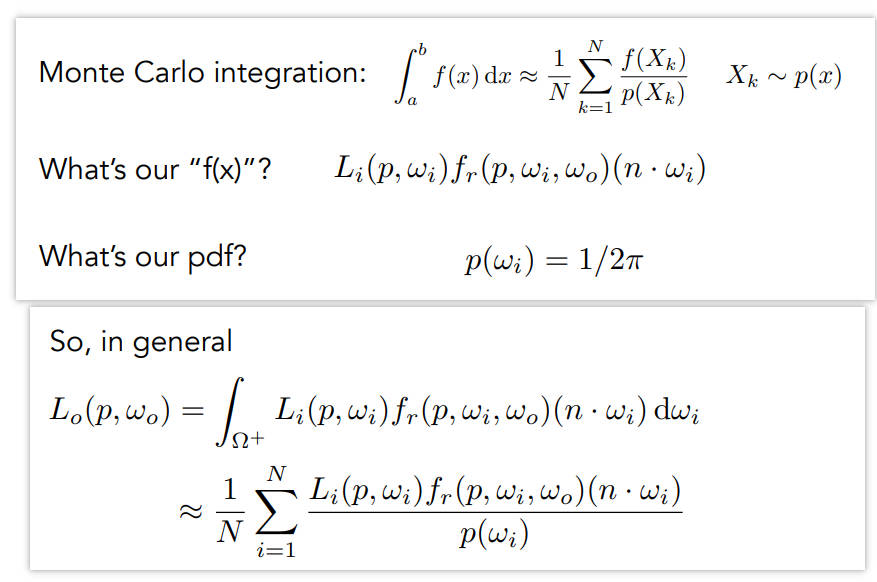
WHY:我们想要算一个函数的积分,但积分难以写出表达公式,所以就用蒙特卡洛的方法求出定积分那个数值来
WHAT&HOW:就是相当于离散化后求面积
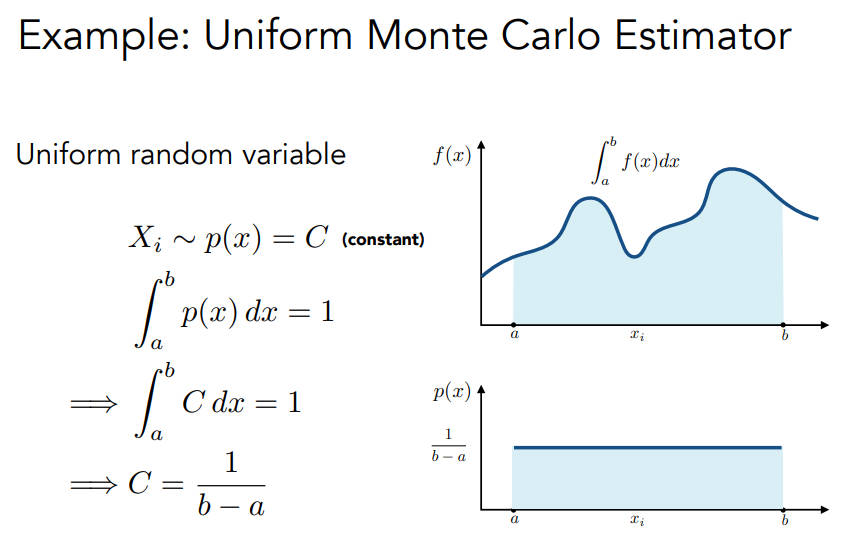
- 其中f(Xi)相当于在Xi处的函数值,除以该函数值出现的概率,就相当于求出了以f(Xi)的值为长,概率密度函数p(Xi)的值为高,的一个矩形面积,就像这样不断采样,在积分域中采样n个,最后除以n,就是蒙特卡洛积分,任何积分都可以这么做
Path Tracing
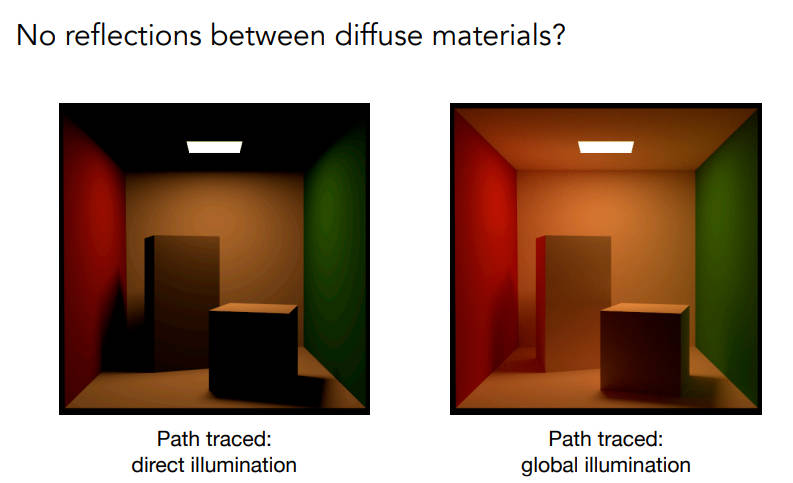
提出path tracing就是为了解决whitted-style ray tracing一些不正确的地方
whitted-style中ray打到diffuse就会停,但是实际上不应该停住
render equation是正确的
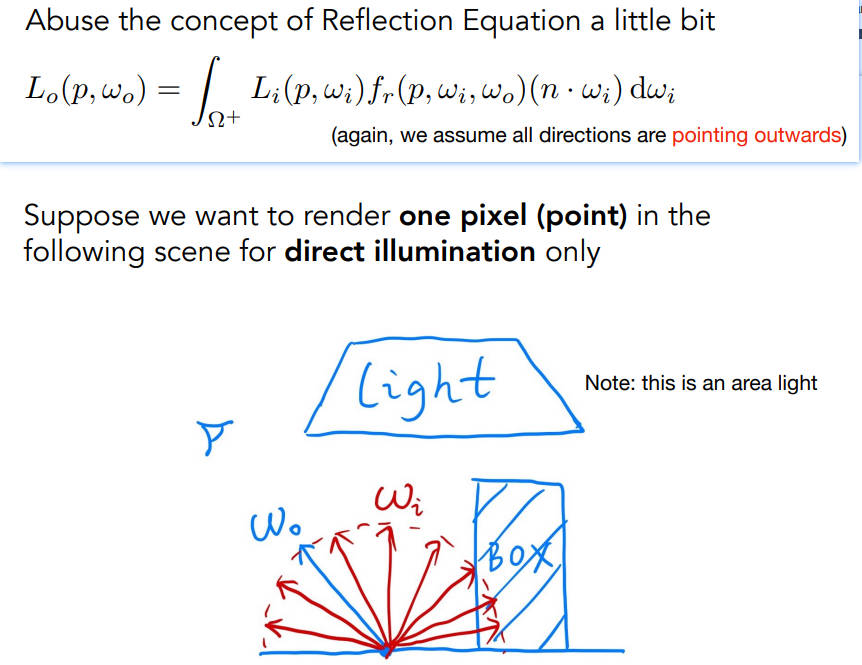
需要计算半球内的积分
需要递归
A Simple Monte Carlo Solution
- 把自发光去掉
其中pdf为啥是$1/2\pi$,这是因为,球的立体角是$4\pi$,半球就是一半
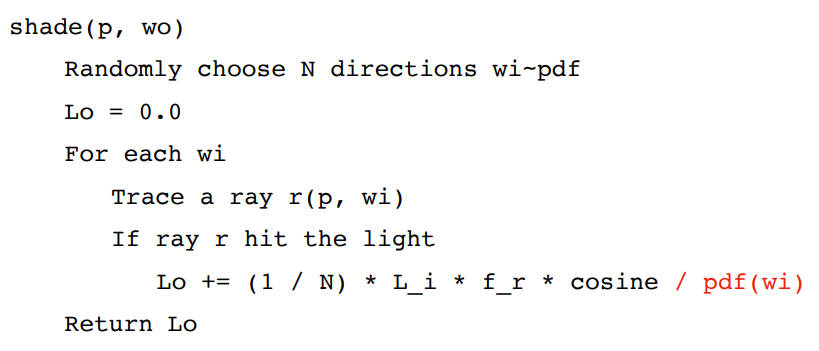
使用蒙特卡洛:
- 直接光照(没有考虑间接光照)的伪代码:
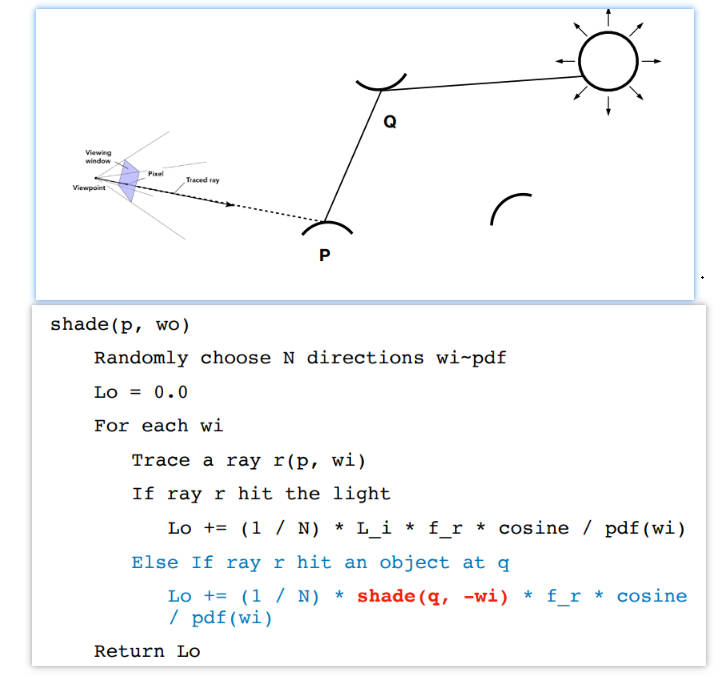
Global Illumination
间接光照,使用递归即可
伪代码如下:
- 但这么做,会产生两个问题
首先是光线的数量会爆炸,数量级会不断增加,当n(也就是随机取的光线数量)为1时,不会爆炸,此时就叫做path tracing,问题就是噪声非常大
- 所以就需要向每个像素投射更多路径然后求平均,投射时也采用蒙特卡洛积分,向像素点随机选择n个位置
递归需要一个终止条件
- 此时,聪明的人类提出了一种方法:Russian Roulette俄罗斯轮盘赌
Russian Roulette (RR)
先前,我们总是会发射一条光线到shading point,然后道德shading结果Lo
现在,我们假设人为地设置一个概率P(0<P<1),在概率P的可能下会发射一条光线并得到shading结果为Lo/P,在概率1-P的可能下不发射光线,结果也就是0
通过这种方法,仍然可以期望得到Lo
$E=p(Lo/P)+(1-P)0=Lo$
- 伪代码如下:
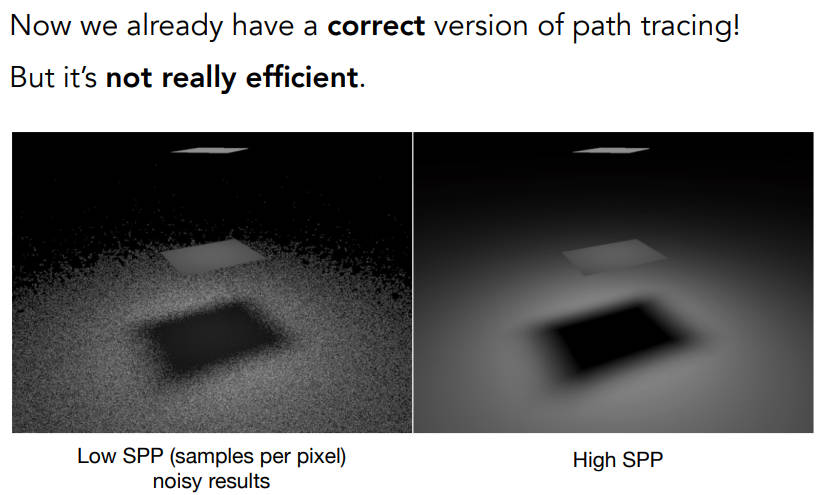
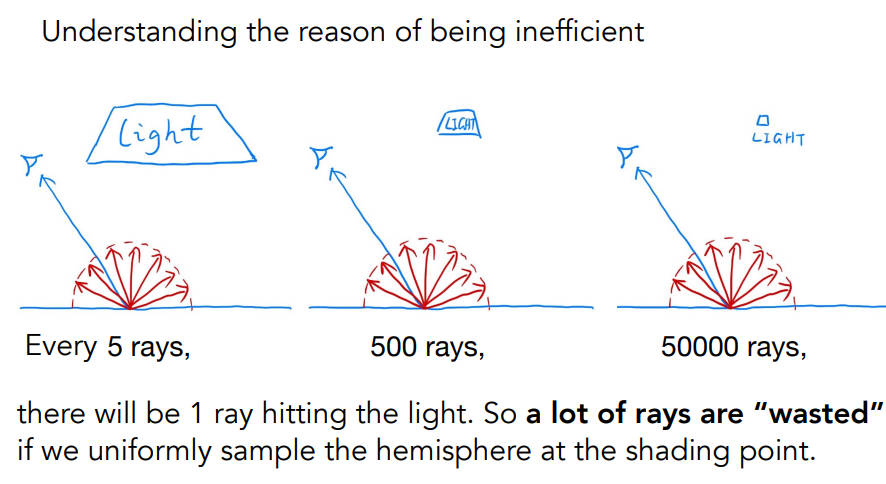
- 但这并不是很高效,因为有的光源很小,所以采样的时候发射很多光线才有可能打到,但这就浪费了很多其他光线,所以就引出了下面的方法:在光源上采样
Sampling the Light(pure math)
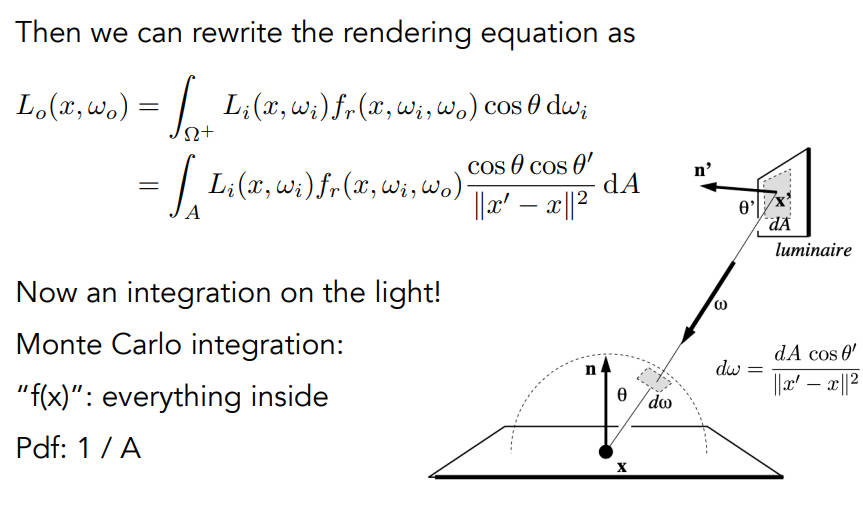
需要把渲染方程写成在光源上的积分
也就是说需要找到dw和dA的关系
首先需要将光源转向着色点
然后除以dA和dw距离的平方
然后就能很快解决蒙特卡洛积分
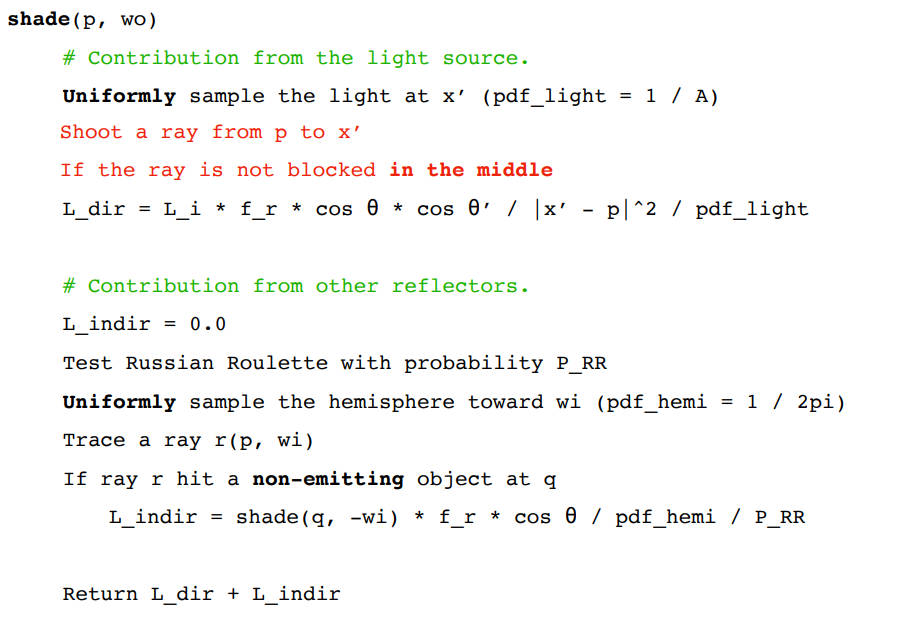
所以现在的path tracing就分为两部分
一部分光线就进行对光源的采样积分
另外一部分反射不到光源的,就进行俄罗斯轮盘赌的蒙特卡洛积分
最后还有一步,要判断光源与着色点之间是不是有其他物体阻挡
伪代码:
尚存的问题
如何在半球进行均匀的采样,如何对一个函数采样
目前用的均匀的pdf是最好的方法吗
随机数有好坏之分吗(low discrepancy sequences的随机数生成的比较均匀)
结合对半球和光源的采样(multiple imp. sampling)
像素的radiance是所有路径radiance的平均,为什么?(pixel reconstruction filter)
像素的radiance就是像素的颜色吗?no(gamma correction, curves, color space)
作业7
在本次实验中,你只需要修改这一个函数:
- castRay(const Ray ray, int depth)in Scene.cpp: 在其中实现 Path Tracing 算法
可能用到的函数有:
intersect(const Ray ray)in Scene.cpp: 求一条光线与场景的交点
sampleLight(Intersection pos, float pdf) in Scene.cpp: 在场景的所有光源上按面积 uniform 地 sample 一个点,并计算该 sample 的概率密度。
形参都是引用参数,也就是说我们需要传入pos交点和pdf变量然后通过这个函数来获取对光源采样的值。
这个函数的大致意思就是,统计整个scene的光源,然后根据每个光源的面积来作为贡献,挨个累加判断是否要对这个光源采样,所以其实这么采样的话,光源的顺序对最终结果是有影响的,不过该案例只有一个光源,所以没关系。正常来讲,需要让光源的顺序尽可能的随机
1
2
3
4
5
6
7
8
9
10
11
12
13
14
15
16
17
18
19
20
void Scene::sampleLight(Intersection &pos, float &pdf) const
{
    float emit_area_sum = 0;
    for (uint32_t k = 0; k < objects.size(); ++k) {
        if (objects[k]->hasEmit()){
            emit_area_sum += objects[k]->getArea();
        }
    }
    float p = get_random_float() * emit_area_sum;
    emit_area_sum = 0;
    for (uint32_t k = 0; k < objects.size(); ++k) {
        if (objects[k]->hasEmit()){
            emit_area_sum += objects[k]->getArea();
            if (p <= emit_area_sum){
                objects[k]->Sample(pos, pdf);
                break;
            }
        }
    }
}
sample(const Vector3f wi, const Vector3f N) in Material.hpp: 按照该材质的性质,给定入射方向与法向量,用某种分布采样一个出射方向
pdf(const Vector3f wi, const Vector3f wo, const Vector3f N) in Material.hpp: 给定一对入射、出射方向与法向量,计算 sample 方法得到该出射方向的概率密度
eval(const Vector3f wi, const Vector3f wo, const Vector3f N) in Material.cpp: 给定一对入射、出射方向与法向量,计算这种情况下的 f_r 值。关于这个eval值,需要特别说明一下
其中,
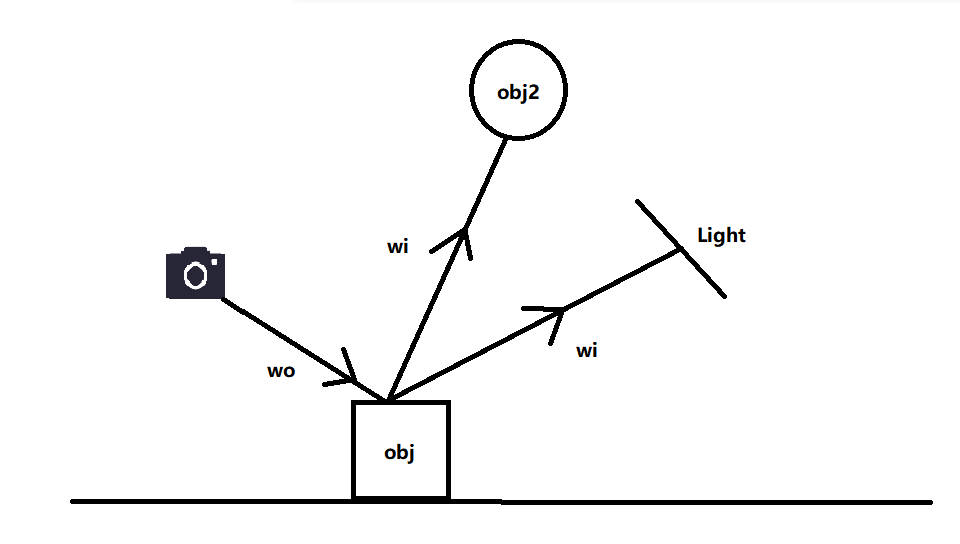
wi是摄像机到物体obj的方向(也就是prime ray),但是在Diffuse模型中不会用到,这个参数会在附加题微表面模型(Microfacet)中用到wo就是物体obj指向光源或者物体obj2的方向,N就是光源或者obj2的法向量那么欸,为什么上面的描述和图片上画的
wi、wo反了呢?那是因为,描述的wi、wo是指函数形参的名字(和图是反的,也就是说,函数形参的wi对应的是图中的wo,那么问题来了,为什么一定要写反,我现在感觉是历史遗留问题,当年写的时候脑子里应该是一团浆糊,看教程这么写,我也这么写了,哎,谁要是不小心看了我的博客,那真的是倒大霉了,2024.3.15留)需要注意的是,这是函数的方向图,在写代码的时候要注意写的方向是不是相反了,如果相反,那么在调用函数的时候需要在前面加个负号
可能用到的变量有:
- RussianRoulette in Scene.cpp: P_RR, Russian Roulette 的概率
前言
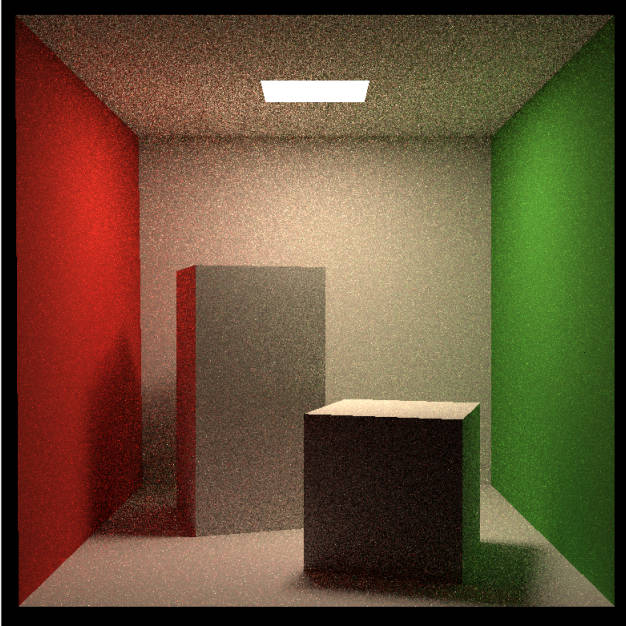
这次作业有一定的难度,参考了很多博客和文章,这些文章将在最后给出链接,都讲的相当不错!虽然文档中说只需要修改castRay()函数,但其实蛮多地方需要修改的,伪代码的话就在上面的图中,那么现在开始简单介绍下我的工作
首先代码框架的get_random_float()需要改下,改成static后,就不会每次调用函数都创建变量了,运行速度更快,而且生成的随机数的质量更高
1
2
3
4
5
6
7
8
inline float get_random_float()
{
    static std::random_device dev;
    static std::mt19937 rng(dev());
    static std::uniform_real_distribution<float> dist(0.f, 1.f); // distribution in range [1, 6]

    return dist(rng);
}
Path Tracing
首先就是修改
castRay函数,整个流程按照伪码来写就好,需要注意的就是伪码中各个变量的含义shade函数其实就是castRay函数(形参depth没太大用,我是没用,但有的博主用了)
在计算直接光照L_dir时
L_i就是光源的emit,这个在Intersection对象中会有这个值
f_r 就是上面提到的eval函数计算出来的
$x\prime$是光源的点
p是着色点,也就是交点
pdf_light就是用
sampleLight函数计算出来的pdf概率
在计算间接光照L_indir时
P_PR就是轮盘赌的概率,其实就是
RussianRoulette,这个是内置的成员变量,直接使用就好,默认是0.8然后就是使用材质类的
sample函数来获取通过采样来计算出的反射方向(这个方向就是要去射向obj2的射线)pdf_hemi是需要使用材质的pdf函数来计算出来的pdf概率
整体代码如下,注意,上面注释的代码是带有中文解释的,但是如果直接与运行带着这么多中文注释的代码的话,就会报错,报未定义标识符的错,我的建议是写英文注释或者写中文注释就一行一行写,写的规范点
1
2
3
4
5
6
7
8
9
10
11
12
13
14
15
16
17
18
19
20
21
22
23
24
25
26
27
28
29
30
31
32
33
34
35
36
37
38
39
40
41
42
43
44
45
46
47
48
49
50
51
52
53
54
55
56
57
58
59
60
61
62
63
64
65
66
67
68
69
70
71
72
73
74
75
76
77
78
79
80
81
82
83
84
85
86
87
88
89
90
91
92
93
94
95
96
97
98
99
100
101
102
103
104
105
106
107
108
109
110
111
Vector3f Scene::castRay(const Ray &ray, int depth) const
{
    //// TO DO Implement Path Tracing Algorithm here
    //Intersection inter = intersect(ray);

    ////如果prime ray没有打到物体
    //if (!inter.happened)return Vector3f();

    ////prime ray打到物体了
    ////0.如果prime ray打到了光源直接返回光源信息
    //if (inter.m->hasEmission()) return inter.m->getEmission();

    ////如果打到的不是光源而是一个物体obj,那么就需要求出直接光照和间接光照

    //Vector3f L_dir;//默认构造函数是初始化为0
    //Vector3f L_indir;
    //float EPLISON = 0.01;
    ////1.直接光照:
    //float light_pdf = 0.f;//初始化
    //Intersection light_inter;
    //sampleLight(light_inter, light_pdf);//获得光源信息,光源的intersection和打到光源的的pdf
    //
    //auto p = inter.coords;//物体obj的坐标
    //auto x = light_inter.coords;//光源的坐标
    //auto ws = (p-x).normalized();//光源到物体obj的方向
    //auto ws_dis = (p - x).norm();//光源到物体obj的距离
    //auto N = inter.normal.normalized();//物体obj的法线
    //auto NN = light_inter.normal.normalized();//光源的法线
    //auto emit = light_inter.emit;//光源的光

    //Ray ws_ray = Ray(p, -ws);//物体obj到光源发出的光线
    //Intersection blocked = intersect(ws_ray);
    //if (ws_dis - blocked.distance < EPLISON)//如果没有打到其他物体,也就是中间没有物体阻挡
    //{
    //    L_dir = emit * inter.m->eval(ray.direction,-ws,N)
    //        *dotProduct(-ws, N)*dotProduct(ws,NN)
    //        /(ws_dis * ws_dis)/ light_pdf;
    //}
    ////2.间接光照:
    //
    //
    //float P_RR = get_random_float();
    //if (P_RR > RussianRoulette) return L_dir;
    ////如果赌赢了,就算间接光照
    ////根据物体obj的材质、入射方向和法线来采样一个出射方向wi
    //Vector3f wi = inter.m->sample(ray.direction, N).normalized();
    //Ray wi_ray(p, wi);//物体obj采样到的指向物体obj2的光线
    //Intersection obj2_inter = intersect(wi_ray);
    ////如果该光线打到物体了而且该物体obj2不是发光物
    //if (obj2_inter.happened && !obj2_inter.m->hasEmission())
    //{

    //    L_indir = castRay(wi_ray, depth+1)
    //        * inter.m->eval(ray.direction, wi, N) * dotProduct(wi, N)
    //        / inter.m->pdf(ray.direction, wi, N) / RussianRoulette;
    //}
    //return L_dir + L_indir;


    Intersection inter = intersect(ray);

    if (!inter.happened)return Vector3f();

    if (inter.m->hasEmission()) return inter.m->getEmission();


    Vector3f L_dir;
    Vector3f L_indir;
    float EPLISON = 0.01;

    float light_pdf;
    Intersection light_inter;
    sampleLight(light_inter, light_pdf);

    auto p = inter.coords;
    auto x = light_inter.coords;
    auto ws = (p - x).normalized();
    auto ws_dis = (p - x).norm();
    auto N = inter.normal.normalized();
    auto NN = light_inter.normal.normalized();
    auto emit = light_inter.emit;

    Ray ws_ray = Ray(p, -ws);
    Intersection blocked = intersect(ws_ray);
    if (ws_dis - blocked.distance < EPLISON)
    {
        L_dir = emit * inter.m->eval(ray.direction, -ws, N)
            * dotProduct(-ws, N) * dotProduct(ws, NN)
            / (ws_dis * ws_dis) / light_pdf;
    }


    float P_RR = get_random_float();
    if (P_RR > RussianRoulette) return L_dir;

    Vector3f wi = inter.m->sample(ray.direction, N).normalized();
    Ray wi_ray(p, wi);
    Intersection obj2_inter = intersect(wi_ray);

    if (obj2_inter.happened && !obj2_inter.m->hasEmission())
    {

        L_indir = castRay(wi_ray, depth + 1)
            * inter.m->eval(ray.direction, wi, N) * dotProduct(wi, N)
            / inter.m->pdf(ray.direction, wi, N) / RussianRoulette;
    }
    return L_dir + L_indir;

}
多线程
这个题目的话,参考两个博客即可
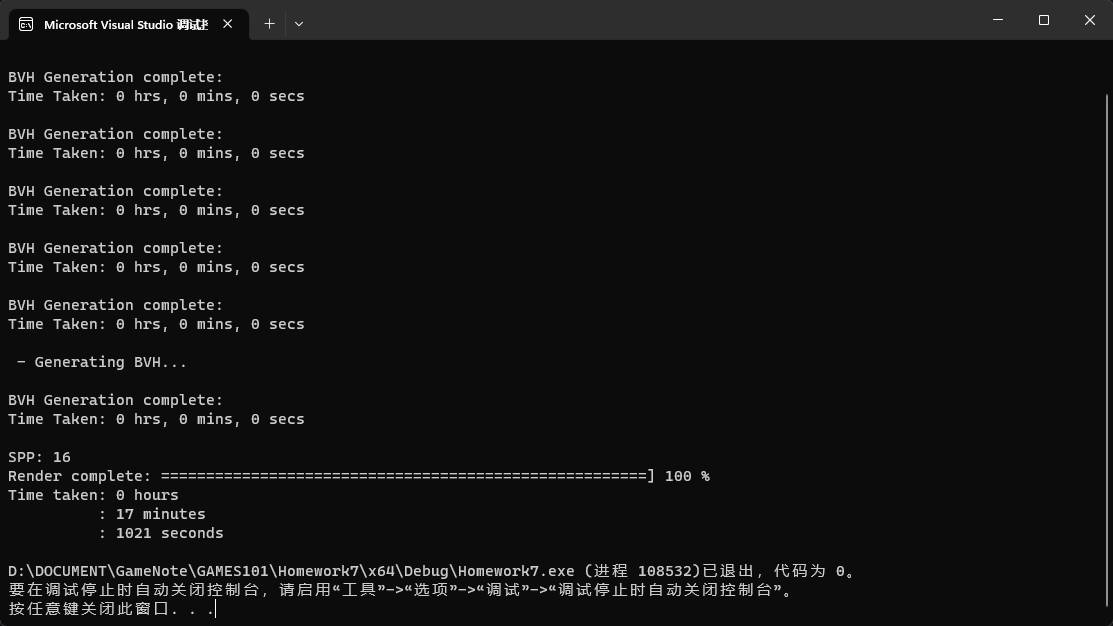
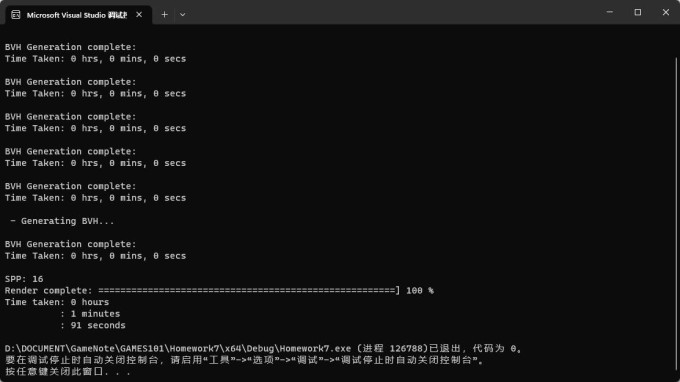
我就不做多解释了,看了第一篇博客,就会对多线程有一个初步的理解,然后可以看看第二个博主的实现过程,其实就是把图片横着分成24份,交给24个线程去做,速度确实有很大的提升
其中,需要注意的点,博主也讲了,就是progress是个所有线程都需要使用的变量,所以要加个mutex锁(其实我试过加atomic_t这样的锁,但是这样的话控制台打印进度的时候就会打一大堆符号,而且并不比上mutex锁快)
代码如下:
在Renderer.cpp文件中添加以下头文件和全局变量
1
2
3
4
5
6
#include <thread>
#include <mutex>


std::mutex mtx;
int progress = 0;
1
2
3
4
5
6
7
8
9
10
11
12
13
14
15
16
17
18
19
20
21
22
23
24
25
26
27
28
29
30
31
32
33
34
35
36
37
38
39
40
41
42
43
44
45
46
47
48
49
50
51
52
53
54
55
56
57
58
59
60
61
62
63
64
65
66
67
68
69
70
71
72
73
74
75
76
void Renderer::Render(const Scene& scene)
{
    std::vector<Vector3f> framebuffer(scene.width * scene.height);

    float scale = tan(deg2rad(scene.fov * 0.5));
    float imageAspectRatio = scene.width / (float)scene.height;
    Vector3f eye_pos(278, 273, -800);
    int m = 0;

    // change the spp value to change sample ammount
    int spp = 16;
    std::cout << "SPP: " << spp << "\n";
    //thread
    int thread = 24;
    int per = scene.height / thread; //40
    std::thread th[24];
    auto RenderRow = [&](uint32_t row1, uint32_t row2) {
        for (uint32_t j = row1; j < row2; ++j) {
            for (uint32_t i = 0; i < scene.width; ++i) {
                // generate primary ray direction
                float x = (2 * (i + 0.5) / (float)scene.width - 1) *
                    imageAspectRatio * scale;
                float y = (1 - 2 * (j + 0.5) / (float)scene.height) * scale;

                Vector3f dir = normalize(Vector3f(-x, y, 1));
                for (int k = 0; k < spp; k++) {
                    framebuffer[(int)(j*scene.width + i)] += scene.castRay(Ray(eye_pos, dir), 0) / spp;
                }

            }
            mtx.lock();
            progress++;
            UpdateProgress(progress / (float)scene.height);
            mtx.unlock();
        }
    };
    for (int i = 0; i < thread; i++)
    {
        th[i] = std::thread(RenderRow, i * per, (i + 1) * per);
    }
    for (int i = 0; i < thread; i++)
    {
        th[i].join();
    }
    // no thread
    /*
    for (uint32_t j = 0; j < scene.height; ++j) {
        for (uint32_t i = 0; i < scene.width; ++i) {
            // generate primary ray direction
            float x = (2 * (i + 0.5) / (float)scene.width - 1) *
                      imageAspectRatio * scale;
            float y = (1 - 2 * (j + 0.5) / (float)scene.height) * scale;

            Vector3f dir = normalize(Vector3f(-x, y, 1));
            for (int k = 0; k < spp; k++){
                framebuffer[m] += scene.castRay(Ray(eye_pos, dir), 0) / spp;
            }
            m++;
        }
        UpdateProgress(j / (float)scene.height);
    }
    */
    UpdateProgress(1.f);

    // save framebuffer to file
    FILE* fp = fopen("binary.ppm", "wb");
    (void)fprintf(fp, "P6\n%d %d\n255\n", scene.width, scene.height);
    for (auto i = 0; i < scene.height * scene.width; ++i) {
        static unsigned char color[3];
        color[0] = (unsigned char)(255 * std::pow(clamp(0, 1, framebuffer[i].x), 0.6f));
        color[1] = (unsigned char)(255 * std::pow(clamp(0, 1, framebuffer[i].y), 0.6f));
        color[2] = (unsigned char)(255 * std::pow(clamp(0, 1, framebuffer[i].z), 0.6f));
        fwrite(color, 1, 3, fp);
    }
    fclose(fp);
}
Microfacet
这道题就有点高难度了,不单是实现,光是概念就有点难,公式推导也有点难度,但是网上做分析的很多,所以借鉴巨人们的肩膀,我们还是能窥见一点点世界的全貌
具体的一些解释还有方法在第二个博客都有讲,所以我就不展开讲咯
代码如下,这些代码都在Material.hpp
1
2
3
4
5
6
7
8
9
10
11
12
13
14
15
16
17
18
19
20
21
22
23
24
25
26
27
28
29
30
31
32
33
34
35
36
37
38
39
40
41
42
43
44
45
46
47
48
49
50
51
52
53
54
55
56
57
58
59
60
61
62
63
64
65
66
67
68
69
70
71
72
73
74
75
76
77
78
79
80
81
82
83
84
85
86
87
88
89
90
91
92
93
/*
    下面三个函数是计算微表面模型方程中的参数D、G(F直接使用框架提供的fresnel函数即可)
    */
    //D
    float DistributionGGX(Vector3f N, Vector3f H, float roughness)
    {
        float a = roughness * roughness;
        float a2 = a * a;
        float NdotH = std::max(dotProduct(N, H), 0.f);
        float NdotH2 = NdotH * NdotH;

        float nom = a2;
        float denom = NdotH2 * (a2 - 1.f) + 1.f;
        denom = M_PI * denom * denom;

        //prevent divide by zero for roughness = 0
        return nom / std::max(denom, 0.000001f);
    }
    //G(下面两个函数都是用来算G的)
    float GeometrySchlickGGX(float NdotV, float k)
    {
        float nom = NdotV;
        float denom = NdotV * (1.0 - k) + k;
        return nom / denom;
    }

    float GeometrySmith(Vector3f N, Vector3f V, Vector3f L, float roughness)
    {
        float r = (roughness + 1.0);
        float k = (r * r) / 8.0;
        float NdotV = std::max(dotProduct(N, V), 0.f);
        float NdotL = std::max(dotProduct(N, L), 0.f);
        float ggx2 = GeometrySchlickGGX(NdotV, k);
        float ggx1 = GeometrySchlickGGX(NdotL, k);
        return ggx1 * ggx2;
    }


    Vector3f Material::eval(const Vector3f &wi, const Vector3f &wo, const Vector3f &N){
    switch(m_type){
        case DIFFUSE:
        {
            // calculate the contribution of diffuse   model
            float cosalpha = dotProduct(N, wo);
            if (cosalpha > 0.0f) {
                Vector3f diffuse = Kd / M_PI;
                return diffuse;
            }
            else
                return Vector3f(0.0f);
            break;
        }
        case MICROFACET:
        {
            //Disney PBR
            float cosalpha = dotProduct(N, wo);
            if (cosalpha > 0.f)
            {
                float roughness = 0.40;

                Vector3f V = -wi;
                Vector3f L = wo;
                Vector3f H = normalize(V + L);

                //compute distribution of normals
                float D = DistributionGGX(N, H, roughness);
                //compute shaddoing masking term
                float G = GeometrySmith(N, V, L, roughness);
                //compute fresnel factor
                float F;
                float etat = 1.85;
                fresnel(wi, N, etat, F);

                Vector3f nominator = D * G * F;
                float denominator = 4 * std::max(dotProduct(N, V), 0.f) * std::max(dotProduct(N , L), 0.f);
                Vector3f specular = nominator / std::max(denominator, 0.001f);

                // conservation of energy
                float ks_ = F;
                float kd_ = 1.0f - ks_;

                Vector3f diffuse = Kd * 1.0 / M_PI;

                //ks_ = F, F is in specular
                return Ks * specular + kd_ * diffuse;
            }
            else
                return Vector3f(0.0f);
            break;
        }
    }
}
- 如果要渲染球的话,需要修改Sphere.hpp中的代码:
1
2
3
4
5
6
7
8
9
10
11
12
13
14
15
16
17
18
19
20
21
22
23
24
25
26
27
Intersection getIntersection(Ray ray){
        Intersection result;
        result.happened = false;
        Vector3f L = ray.origin - center;
        float a = dotProduct(ray.direction, ray.direction);
        float b = 2 * dotProduct(ray.direction, L);
        float c = dotProduct(L, L) - radius2;
        float t0, t1;
        if (!solveQuadratic(a, b, c, t0, t1)) return result;
        if (t0 < 0) t0 = t1;
        if (t0 < 0) return result;


        //set accuracy
        if (t0 > 0.5)
        {
            result.happened = true;

            result.coords = Vector3f(ray.origin + ray.direction * t0);
            result.normal = normalize(Vector3f(result.coords - center));
            result.m = this->m;
            result.obj = this;
            result.distance = t0;
        }
        return result;

    }
- 然后就是在main函数中添加Sphere的代码
1
2
3
4
5
6
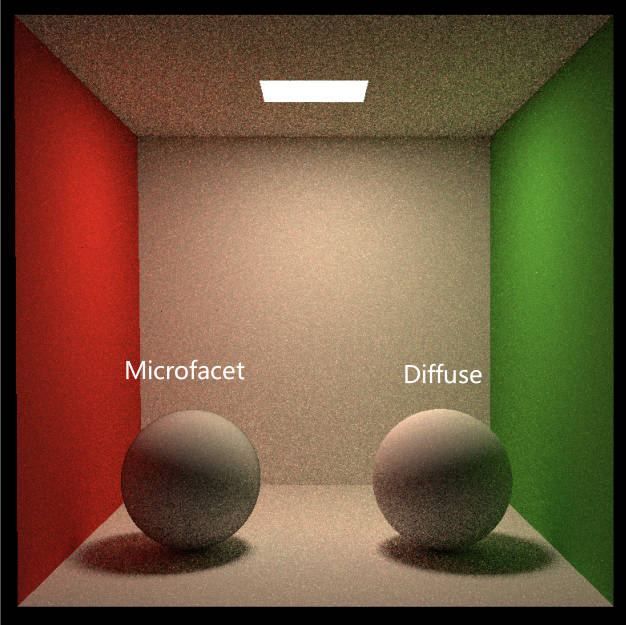
    Material* whiteMicro = new Material(MICROFACET, Vector3f(0.0f));
    whiteMicro->Kd = Vector3f(0.725f, 0.71f, 0.68f);
    Sphere* sphereDiffuse = new Sphere({ 130.f,80.f,200.f }, 80.f, white);
    Sphere* sphereMicro = new Sphere({ 420.f,80.f,200.f }, 80.f, whiteMicro);
    scene.Add(sphereDiffuse);
    scene.Add(sphereMicro);
- 不要忘记修改whiteMicro的Kd值,不然就会全黑
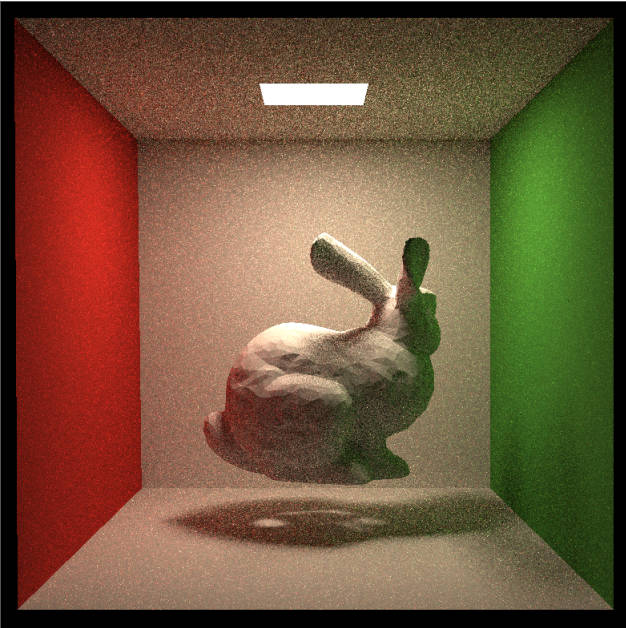
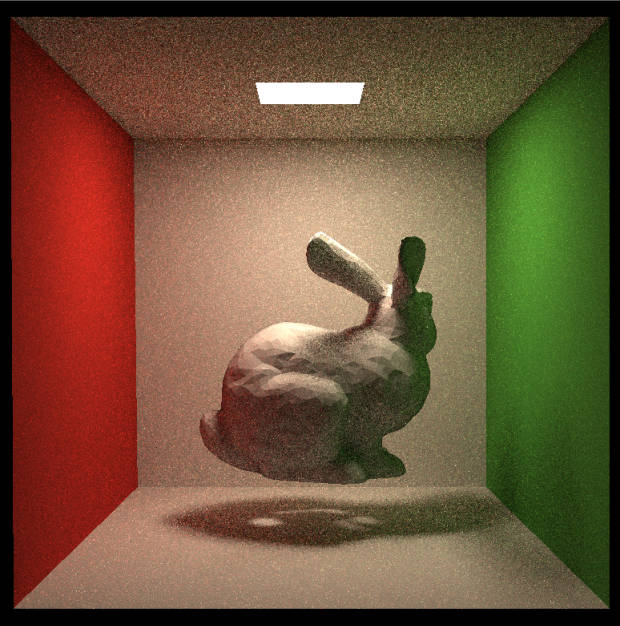
然后就是bunny,想要添加buuny需要改两处
参考博客(23条消息) Games101:作业7(含提高部分)_games101作业7实现 microfacet模型_Q_pril的博客-CSDN博客
首先是Triangle.hpp的构造函数,加两个形参,然后再改下vert
1
2
3
4
5
6
7
8
9
10
11
12
13
14
15
16
17
18
19
20
21
22
23
24
25
26
27
28
29
30
31
32
33
34
35
36
37
38
39
40
41
42
43
44
45
46
47
48
MeshTriangle(const std::string& filename, Material *mt = new Material(),
        Vector3f Trans = Vector3f(0.0f, 0.0f, 0.0f), Vector3f Scale = Vector3f(1.0f, 1.0f, 1.0f))
    {
        objl::Loader loader;
        loader.LoadFile(filename);
        area = 0;
        m = mt;
        assert(loader.LoadedMeshes.size() == 1);
        auto mesh = loader.LoadedMeshes[0];

        Vector3f min_vert = Vector3f{std::numeric_limits<float>::infinity(),
                                     std::numeric_limits<float>::infinity(),
                                     std::numeric_limits<float>::infinity()};
        Vector3f max_vert = Vector3f{-std::numeric_limits<float>::infinity(),
                                     -std::numeric_limits<float>::infinity(),
                                     -std::numeric_limits<float>::infinity()};
        for (int i = 0; i < mesh.Vertices.size(); i += 3) {
            std::array<Vector3f, 3> face_vertices;

            for (int j = 0; j < 3; j++) {
                auto vert = Vector3f(mesh.Vertices[i + j].Position.X,
                                     mesh.Vertices[i + j].Position.Y,
                                     mesh.Vertices[i + j].Position.Z);
                //for the bunny
                vert = Scale * vert + Trans;
                face_vertices[j] = vert;

                min_vert = Vector3f(std::min(min_vert.x, vert.x),
                                    std::min(min_vert.y, vert.y),
                                    std::min(min_vert.z, vert.z));
                max_vert = Vector3f(std::max(max_vert.x, vert.x),
                                    std::max(max_vert.y, vert.y),
                                    std::max(max_vert.z, vert.z));
            }

            triangles.emplace_back(face_vertices[0], face_vertices[1],
                                   face_vertices[2], mt);
        }

        bounding_box = Bounds3(min_vert, max_vert);

        std::vector<Object*> ptrs;
        for (auto& tri : triangles){
            ptrs.push_back(&tri);
            area += tri.area;
        }
        bvh = new BVHAccel(ptrs);
    }
- 其次main函数
1
2
MeshTriangle bunny("../models/bunny/bunny.obj", white, Vector3f(300.f,0.f,300.f),Vector3f(2000.f, 2000.f, 2000.f));
scene.Add(&bunny);
- 看看bunny的臀部的话,还是能多少看出来一点Microfacet的小小震撼的23333

