Applications of Textures
In modern GPUs, texture = memory + range query (filtering)
Environment Map环境贴图
Spherical Map、Cube Map
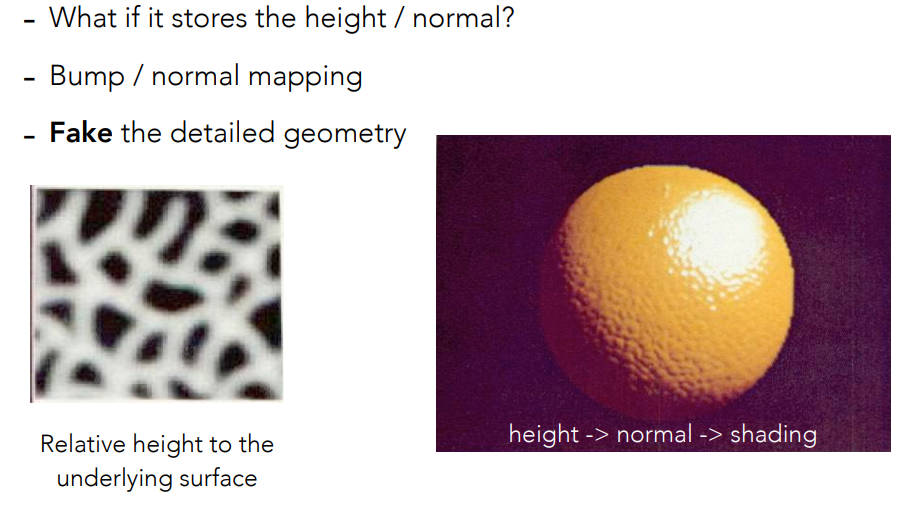
Bump Mapping
- 定义的是纹理上任意一个点,高度的相对移动
- 通过凹凸贴图(也可以说是高度贴图),改变了原来的点的高度(实际没改,只是用来算法线),从而改变了法线的方向,制造了凹凸的效果

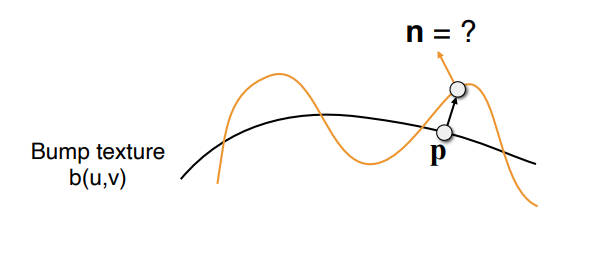
- 对平面来说:该点的切线方向是(1,dp),dp就是凹凸贴图存的值,那么该点的法线方向就是转90°,也就是(-dp,1)
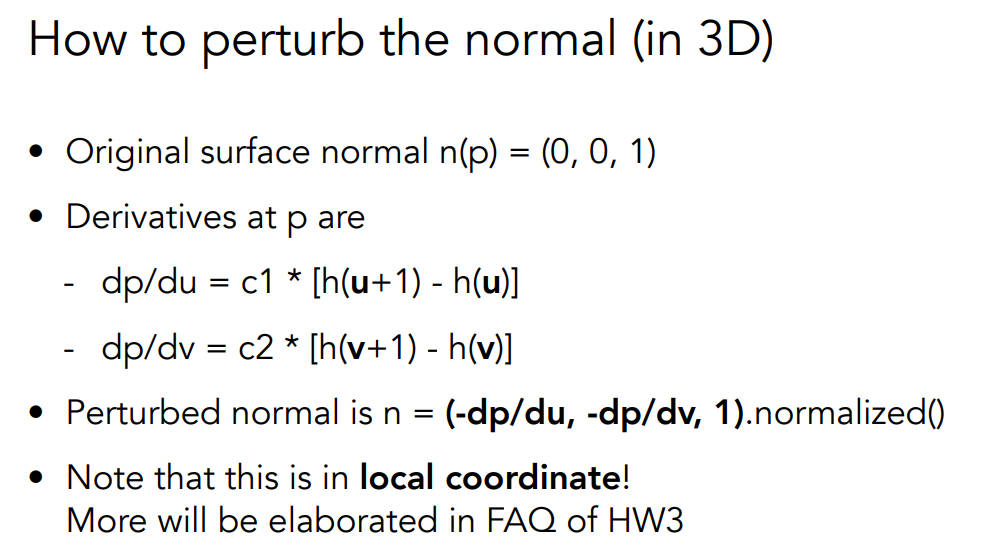
- 在三维空间中,假设一个法向量(0,0,1),根据凹凸图某一点uv的梯度值来计算出扰乱后的切线,最后旋转就成了扰乱后的法线也就是(-dp/du,-dp/dv,1),因为假设的法向量(0,0,1)在local坐标系(局部坐标系stn),所以之后还需要转换
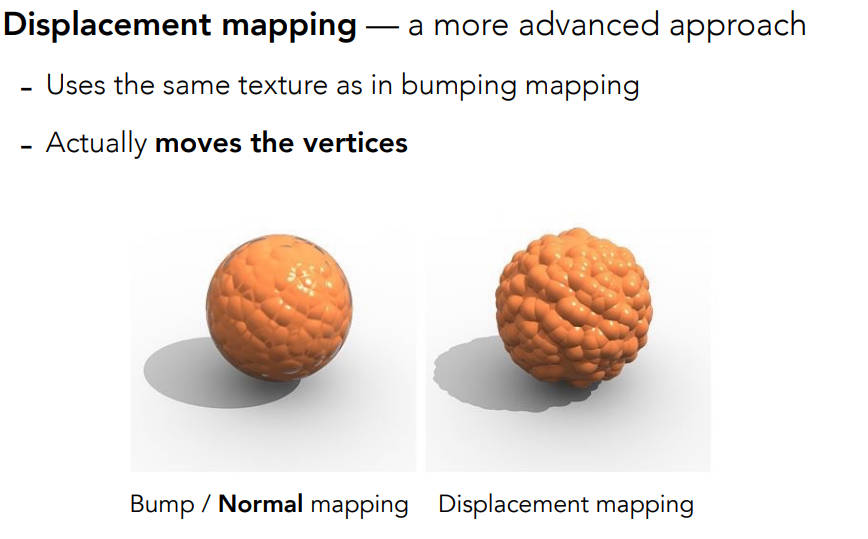
Displacement mapping
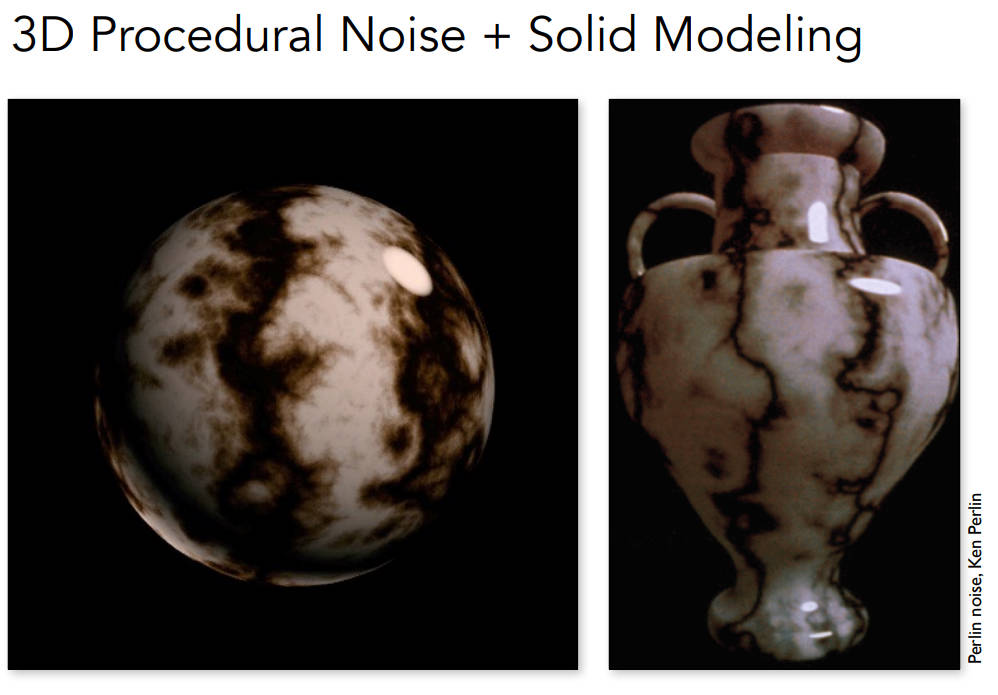
- 3d生成噪声作为贴图
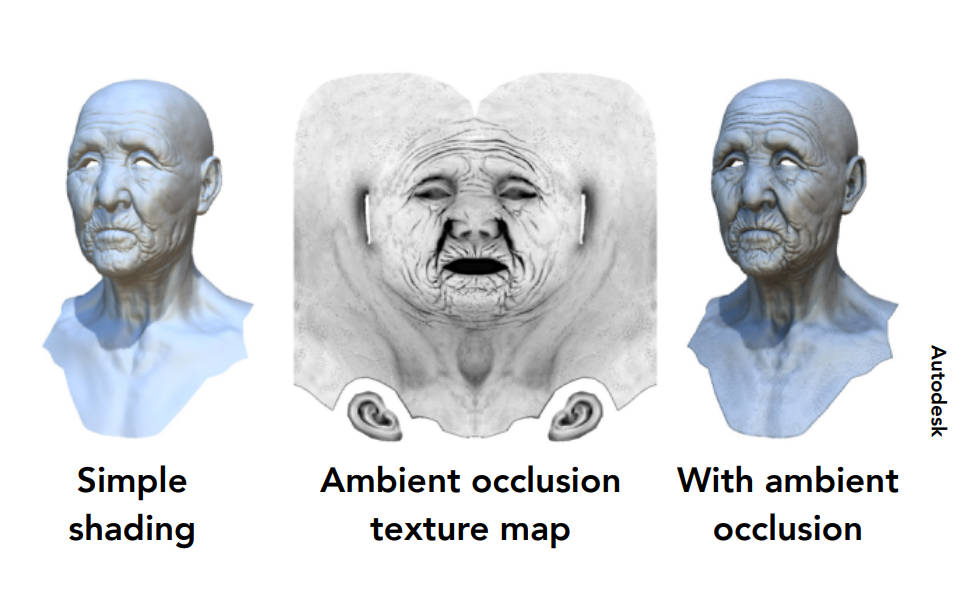
- 环境光遮罩贴图
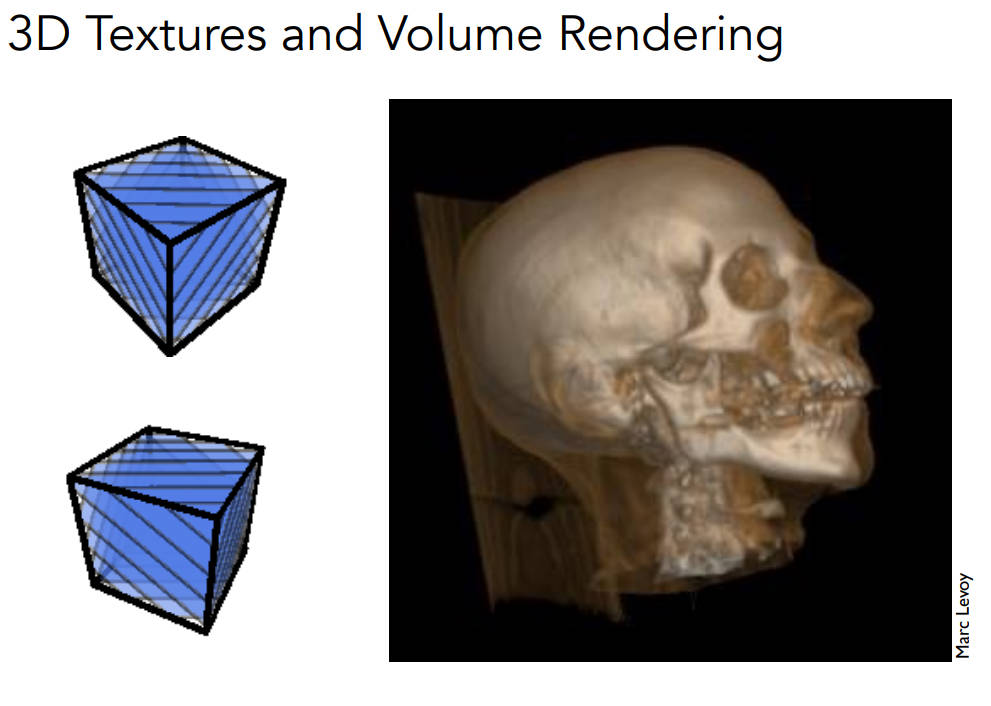
- 体渲染
Geometry
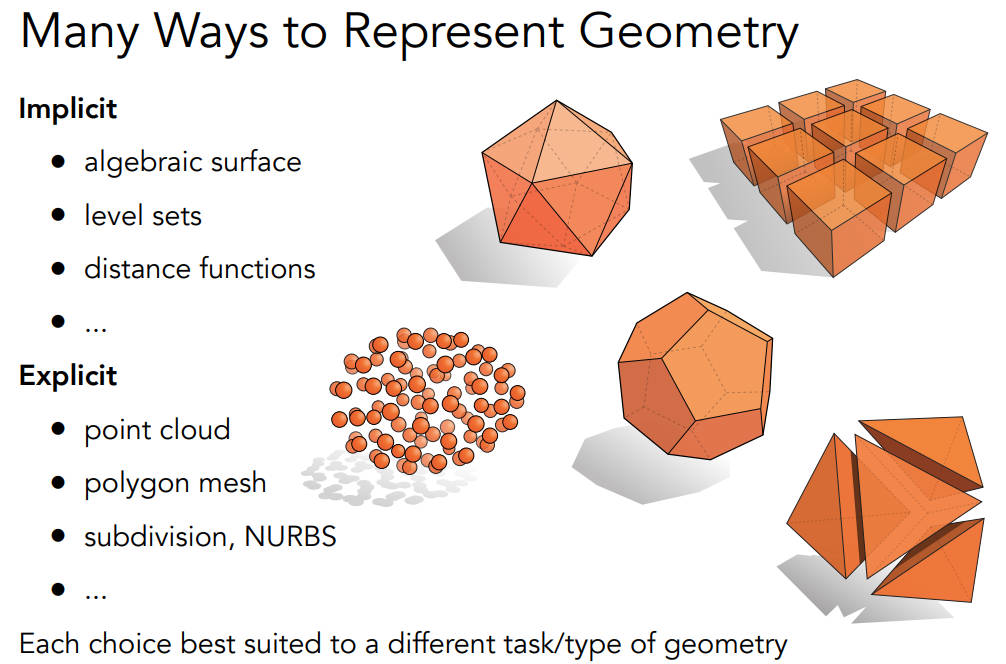
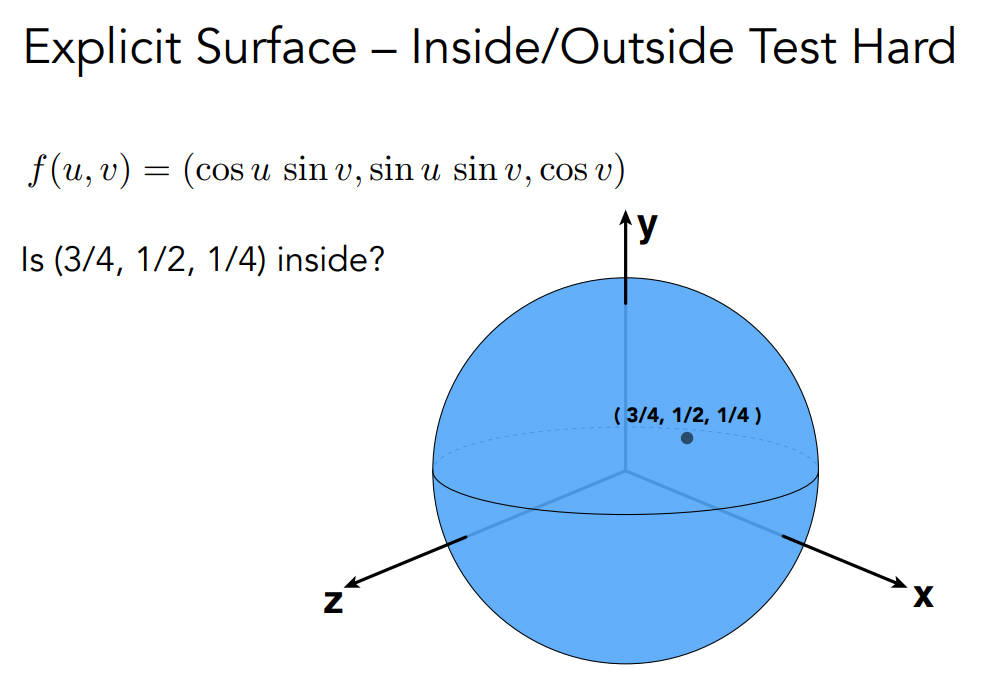
implicit隐式几何
- 点满足一些特殊的关系,比如一个球的方程,并不给实际的点
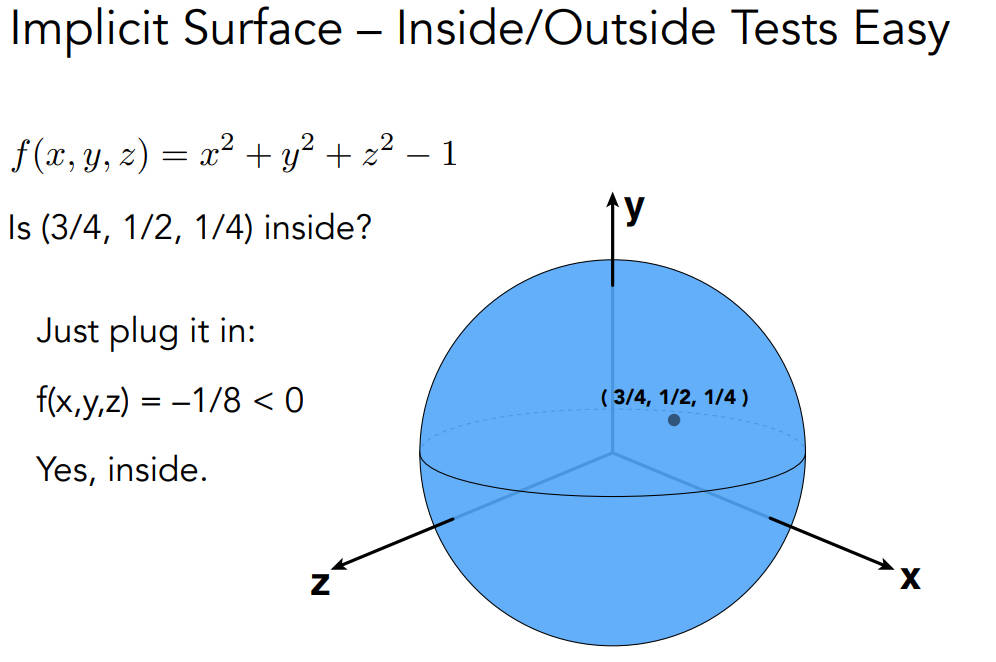
- 难点在于哪些点符合这个关系,很难从式子看出来是什么模型。但是,给定一个点,判断这个点在不在这个面上,很容易。直接把点代入式子,如果是0在面上,大于0在外,小于0在内
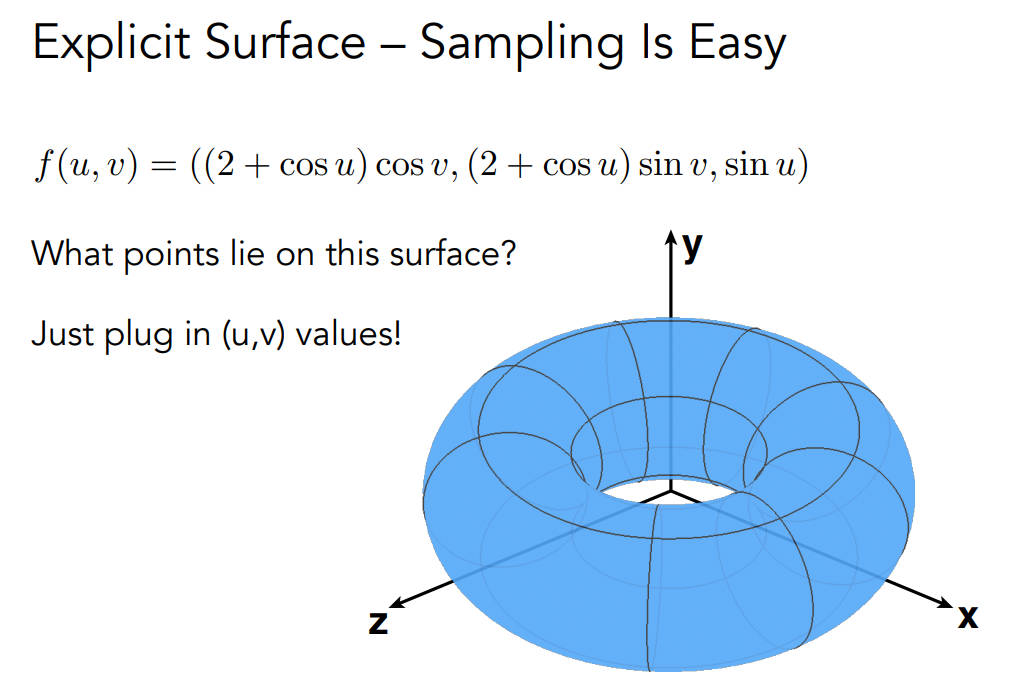
explicit显式几何
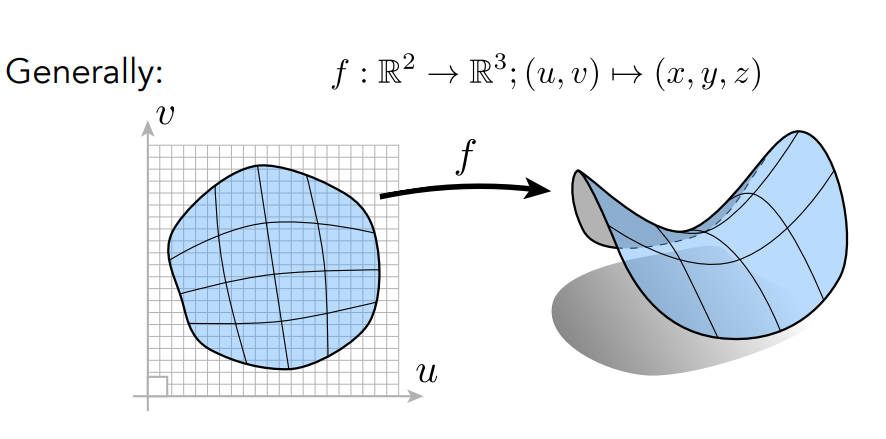
要么直接给出,要么通过参数映射的方式给出
把所有uv找一遍就知道在三维空间中长什么样,所以采样更简单;但是判断某个点是否在平面的里外,很难

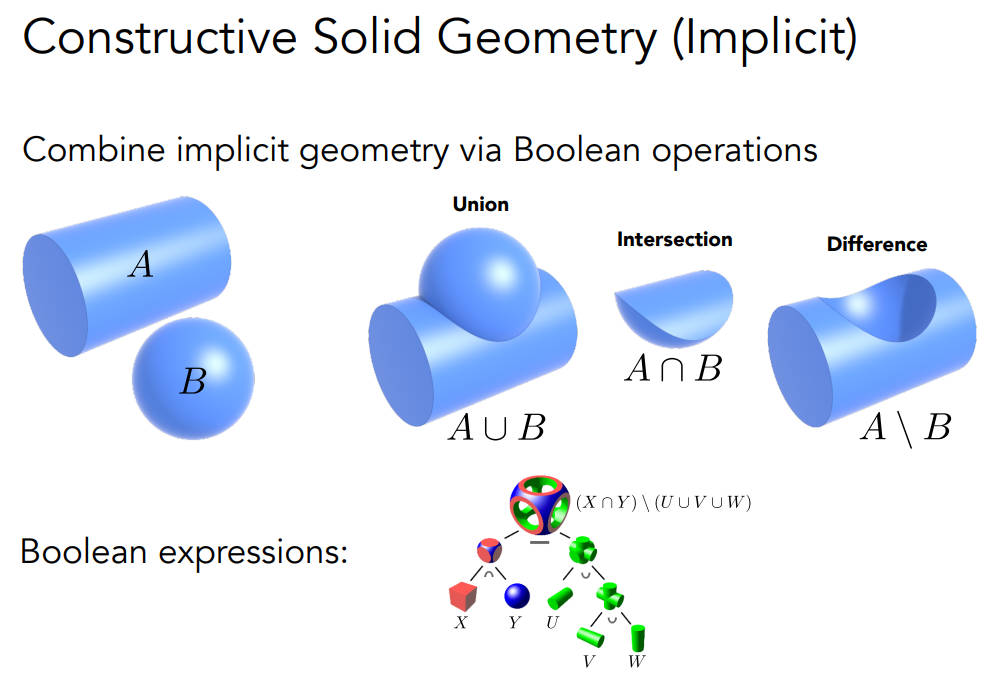
CSG(constructive solid geometry)(implicit)
- 通过基本的几何的组合来构造几何
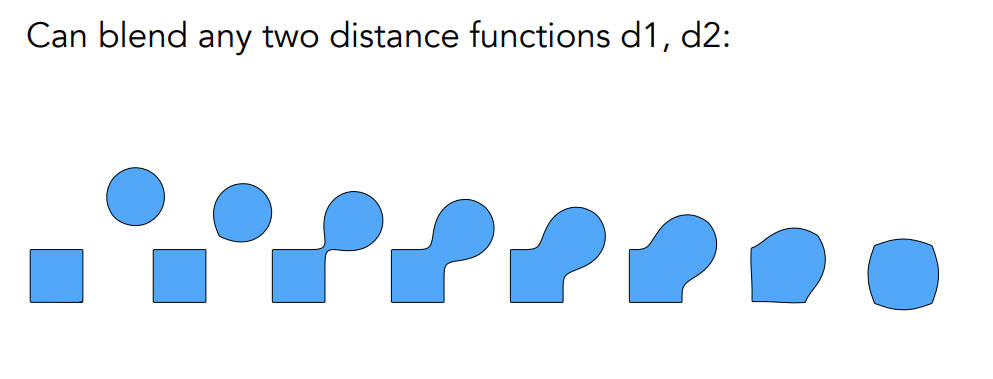
Distance Functions(implicit)
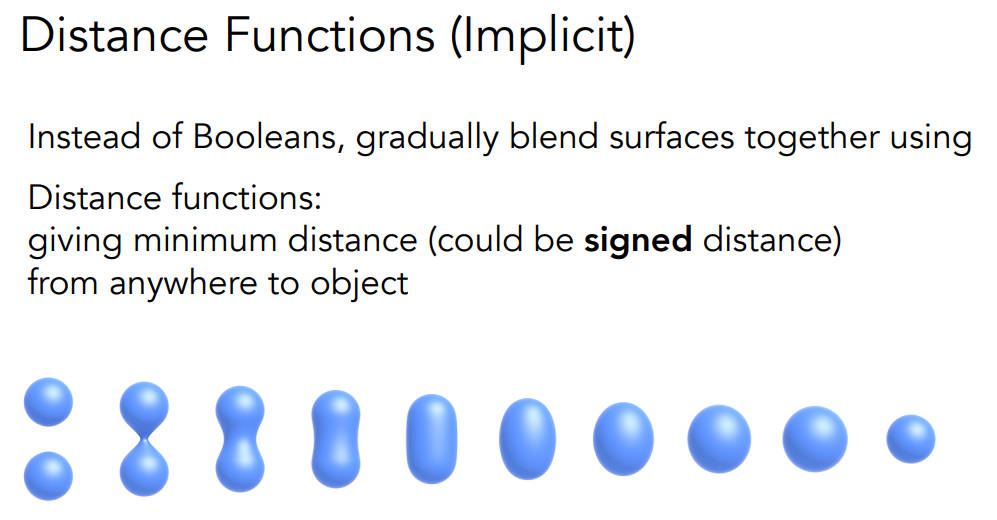
- 距离函数是指空间中任意一个点到一个模型的最短距离,如果这个点在模型的面外就是正的,如果在面内,就是负的
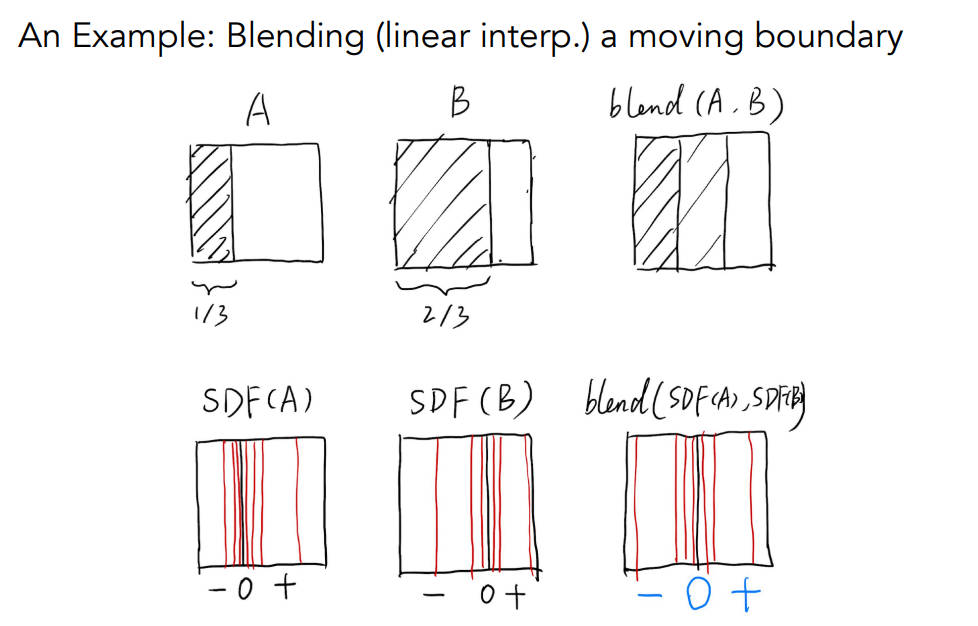
A是一个物体挡住窗口1/3时候的一张图,B是该物体挡住窗口的2/3时候的一张图,现在的目标是求出这两个状态中间状态的样子
如果拿两张图做一个线性blend(相加除以二),那么左边黑,中间灰,右边白
但是我们希望的结果是运动的中间态也就是左边一半是黑的,右边一半是白的
SDF是signed distance function。对A和B计算距离函数也就是变换成SDF(A)和SDF(B),再通过距离函数来blend,这样的话结果中间就会是0,最后再恢复
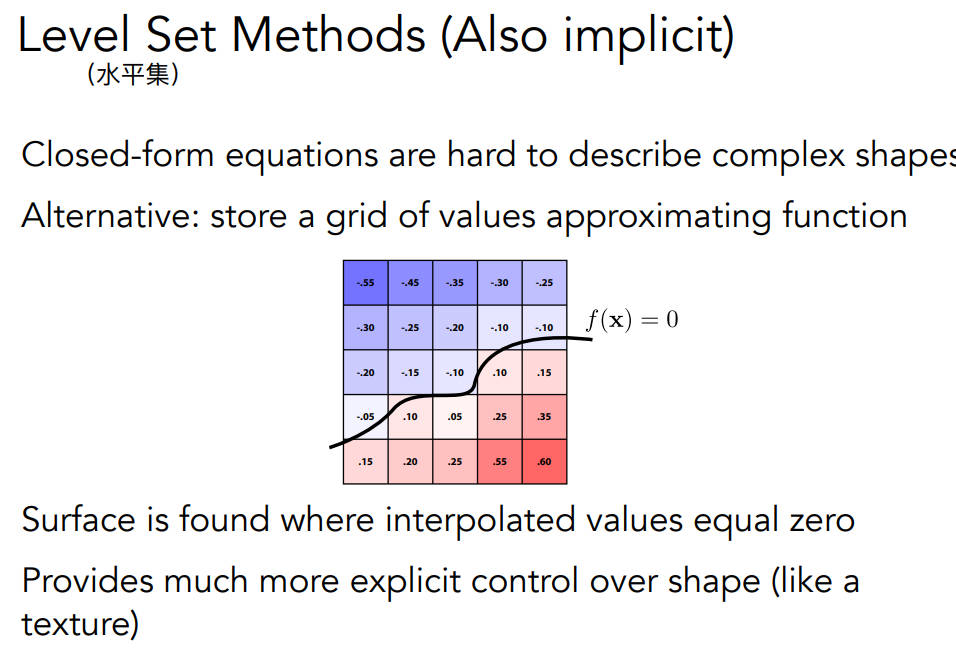
Level Set Methods水平集方法(类似距离函数)
- Fractals分形(自相似)(递归)
作业3
作业描述:
在这次编程任务中,我们会进一步模拟现代图形技术。我们在代码中添加了
Object Loader(用于加载三维模型), Vertex Shader 与 Fragment Shader,并且支持
了纹理映射。
而在本次实验中,你需要完成的任务是:
- 修改函数 rasterize_triangle(const Triangle& t) in rasterizer.cpp: 在此
处实现与作业 2 类似的插值算法,实现法向量、颜色、纹理颜色的插值。
- 修改函数 get_projection_matrix() in main.cpp: 将你自己在之前的实验中
实现的投影矩阵填到此处,此时你可以运行 ./Rasterizer output.png normal
来观察法向量实现结果。
- 修改函数 phong_fragment_shader() in main.cpp: 实现 Blinn-Phong 模型计
算 Fragment Color.
- 修改函数 texture_fragment_shader() in main.cpp: 在实现 Blinn-Phong
的基础上,将纹理颜色视为公式中的 kd,实现 Texture Shading Fragment
Shader.
- 修改函数 bump_fragment_shader() in main.cpp: 在实现 Blinn-Phong 的
基础上,仔细阅读该函数中的注释,实现 Bump mapping.
- 修改函数 displacement_fragment_shader() in main.cpp: 在实现 Bump
mapping 的基础上,实现 displacement mapping
上来报错namespace “std” has no member “optional”,这是因为optional是C++17新特性,我的vs默认是C++14,在项目属性->常规中修改标准版本为C++17即可
源代码部分:
第一,实现插值,首先是跟作业二很相似的框架,先判断bonding box,然后遍历里面的像素,需要注意的是insideTriangle函数已经写好了,直接传三角形的顶点数组就行了,不需要再算出来三角形的边了,我刚开始传进去的是三角形的三条边,但这样是不对的,源码写的很迷,我看不明白,gpt的意思是cross坐了相减的功能,我觉得蛮离谱的,反正要是我写,肯定不这么写,读起来有歧义
还有就是,c++有实现插值函数,不用自己写循环,麻了
1
2
3
4
5
6
7
8
9
10
11
12
13
14
15
16
17
18
19
20
21
22
23
24
25
26
27
28
29
30
31
32
33
34
35
36
37
38
39
40
41
42
43
44
45
46
47
48
49
50
51
52
53
54
55
56
57
58
59
60
61
void rst::rasterizer::rasterize_triangle(const Triangle& t, const std::array<Eigen::Vector3f, 3>& view_pos)
{
    auto v = t.toVector4();
    //先找到三角形的边界box,即找到左下角和右上角,以此为区间遍历
    int left = std::min(std::min(v[0][0], v[1][0]), v[2][0]);
    int bottom = std::min(std::min(v[0][1], v[1][1]), v[2][1]);
    int right = std::max(std::max(v[0][0], v[1][0]), v[2][0]);
    int top = std::max(std::max(v[0][1], v[1][1]), v[2][1]);

    for (float x = left; x <= right; x++)
    {
        for (float y = bottom; y <= top; y++)
        {
            //这里是直接传t.v
            if (insideTriangle(x+0.5,y+0.5,t.v))
            {
                //插值
                float alpha, beta, gamma;
                //插值算深度(虽然我不太清楚为啥这么算)
                std::tie(alpha, beta, gamma) = computeBarycentric2D(x + 0.5, y + 0.5, t.v);
                float Z = 1.0 / (alpha / t.v[0].w() + beta / t.v[1].w() + gamma / t.v[2].w());
                float zp = alpha * t.v[0].z() / t.v[0].w() + beta * t.v[1].z() / t.v[1].w() + gamma * t.v[2].z() / t.v[2].w();
                zp *= Z;
                if (zp < depth_buf[get_index(x, y)])
                {
                    depth_buf[get_index(x, y)] = zp;
                    //插值算颜色、法向量、纹理坐标和着色坐标(其实是视空间坐标)
                    //我本来以为一直报错是因为我的变量不是const类型,看来是我之前的判断错误了

                    Vector3f interpolated_color;
                    for (int i = 0; i < 3; i++)
                    {
                        interpolated_color[i] = alpha * t.color[0][i] + beta * t.color[1][i] + gamma * t.color[2][i];
                    }
                    Vector3f interpolated_normal;
                    for (int i = 0; i < 3; i++)
                    {
                        interpolated_normal[i] = alpha * t.normal[0][i] + beta * t.normal[1][i] + gamma * t.normal[2][i];
                    }
                    interpolated_normal = interpolated_normal.normalized();//法向量归一化
                    auto interpolated_texcoords = interpolate(alpha, beta, gamma, t.tex_coords[0], t.tex_coords[1], t.tex_coords[2], 1.0);

                    //计算视空间插值view_pos的插值
                    Vector3f interpolated_shadingcoords;
                    for (int i = 0; i < 3; i++)
                    {
                        interpolated_shadingcoords[i] = alpha * view_pos[0][i] + beta * view_pos[1][i] + gamma * view_pos[2][i];
                    }//着色坐标(其实应该是视空间坐标)
                    fragment_shader_payload payload(interpolated_color, interpolated_normal,interpolated_texcoords, texture ? &*texture : nullptr);
                    payload.view_pos = interpolated_shadingcoords;

                    Vector2i point(x, y);
                    Vector3f pixel_color = fragment_shader(payload);
                    //原来问题出在这个set_pixel上,传入的参数与形参类型不一样
                    set_pixel(point, pixel_color);
                }

            }
        }
    }
}
- 第二,投影矩阵,这个矩阵不能像上一次直接取负号了,会把模型显示反过来所以要小改一下,我的建议是直接用现成的,别想着怎么回事了,每个厂商的坐标系啊什么的都不一样,反正清楚流程就行了,不用在这种厂商问题纠结
1
2
3
4
5
6
7
8
9
10
11
12
13
14
15
16
17
18
19
20
21
22
23
24
25
26
27
28
29
30
31
32
33
34
35
Eigen::Matrix4f get_projection_matrix(float eye_fov, float aspect_ratio, float zNear, float zFar)
{
    // TODO: Use the same projection matrix from the previous assignments
    //aspect_ratio = r / t;
    //tan(eye_fov)/2 = t/|n|;
    /*zNear = -zNear;
    zFar = -zFar;*/
    Eigen::Matrix4f projection = Eigen::Matrix4f::Identity();
    float t = tan(eye_fov / 2 / 180.f * MY_PI) * (-zNear);
    float b = -t;
    float r = aspect_ratio * t;
    float l = -r;
    Eigen::Matrix4f m1 = Eigen::Matrix4f::Identity();//缩放矩阵
    Eigen::Matrix4f m2 = Eigen::Matrix4f::Identity();//平移矩阵
    m1(0, 0) = 2.f / (r - l);
    m1(1, 1) = 2.f / (t - b);
    m1(2, 2) = 2.f / (zNear - zFar);

    m2(0, 3) = -(r + l) / 2.f;
    m2(1, 3) = -(t + b) / 2.f;
    m2(2, 3) = -(zNear + zFar) / 2.f;

    Eigen::Matrix4f Mortho = m1 * m2;//正交矩阵

    //平截头体压缩至长方体矩阵
    Eigen::Matrix4f Mpersp2ortho;
    Mpersp2ortho <<
        zNear, 0.f, 0.f, 0.f,
        0.f, zNear, 0.f, 0.f,
        0.f, 0.f, zNear + zFar, -zNear * zFar,
        0.f, 0.f, 1.f, 0.f;

    projection = Mortho * Mpersp2ortho;
    return projection;
}
- 第三,此时使用
normal_fragment_shader可以看看效果,但需要注意的是,运行时可能会报错,也就是在执行getColor函数的时候,运行到auto color = image_data.at<cv::Vec3b>(v_img, u_img);这行代码,会报数组越界的错,所以要修改下这个函数,岂可休!浪费我好多时间,改成:(参考GAMES101-作业1、作业2、作业3的解题和框架分析 - 知乎 (zhihu.com)的作业3讲解,有说这个问题)
1
2
3
4
5
6
7
8
9
10
11
 Eigen::Vector3f getColor(float u, float v)
    {
        int u_img = static_cast<int>(u * width);
        int v_img = static_cast<int>((1 - v) * height);
        if (u_img < 0) u_img = 0;
        if (u_img >= width) u_img = width - 1;
        if (v_img < 0) v_img = 0;
        if (v_img >= height) u_img = height - 1;
        auto color = image_data.at<cv::Vec3b>(v_img, u_img);
        return Eigen::Vector3f(color[0], color[1], color[2]);
    }
- 实现
phong_fragment_shader()。这里需要注意的有一点,就是环境光的光强要用amb_light_intensity,如果用light.intensity就会全白
1
2
3
4
5
6
7
8
9
10
11
12
13
14
15
16
17
18
19
20
21
22
23
24
25
26
27
28
29
30
31
32
33
34
35
36
37
38
39
40
41
42
43
44
45
46
Eigen::Vector3f phong_fragment_shader(const fragment_shader_payload& payload)
{
    Eigen::Vector3f ka = Eigen::Vector3f(0.005, 0.005, 0.005);
    Eigen::Vector3f kd = payload.color;
    Eigen::Vector3f ks = Eigen::Vector3f(0.7937, 0.7937, 0.7937);

    auto l1 = light{ {20, 20, 20} , {500, 500, 500} } ;
    auto l2 = light{ {-20, 20, 0} , {500, 500, 500} } ;

    std::vector<light> lights = {l1, l2};
    Eigen::Vector3f amb_light_intensity{10, 10, 10};
    Eigen::Vector3f eye_pos{0, 0, 10};

    float p = 150;

    Eigen::Vector3f color = payload.color;
    Eigen::Vector3f point = payload.view_pos;//片元在view空间下的坐标
    Eigen::Vector3f normal = payload.normal;// 表面法线

    Eigen::Vector3f result_color = {0, 0, 0};
    for (auto& light : lights)
    {
        Eigen::Vector3f l = light.position - point;//光照方向同时也是光源到着色点的偏移向量
        Eigen::Vector3f v = eye_pos - point;//注视方向
        float r = l.squaredNorm();//计算光源到着色点的距离
        l = l.normalized();
        v = v.normalized();
        Eigen::Vector3f h = v + l;
        h = h.normalized();
        // TODO: For each light source in the code, calculate what the *ambient*, *diffuse*, and *specular*
        // components are. Then, accumulate that result on the *result_color* object.
        Eigen::Vector3f ambient;
        Eigen::Vector3f diffuse;
        Eigen::Vector3f specular;
        for (int i = 0; i < 3; i++)
        {
            ambient[i] = ka[i] * amb_light_intensity[i];
            diffuse[i] = kd[i] * (light.intensity[i] / r) * std::max(0.f, normal.dot(l)) ;
            specular[i] = ks[i] * (light.intensity[i] / r) * pow(std::max(0.f, normal.dot(h)),p);//先不做p的次方
            result_color[i] += (ambient[i] + diffuse[i] + specular[i]);
        }

    }

    return result_color * 255.f;
}
- 第四,实现
texture_fragment_shader()。只需要让颜色值是return_color就行了,别的跟phong都一样
1
2
3
4
5
6
7
    Eigen::Vector3f return_color = {0, 0, 0};
    if (payload.texture)
    {
        // TODO: Get the texture value at the texture coordinates of the current fragment
        return_color = payload.texture->getColor(payload.tex_coords.x(), payload.tex_coords.y());

    }
- 第五,实现
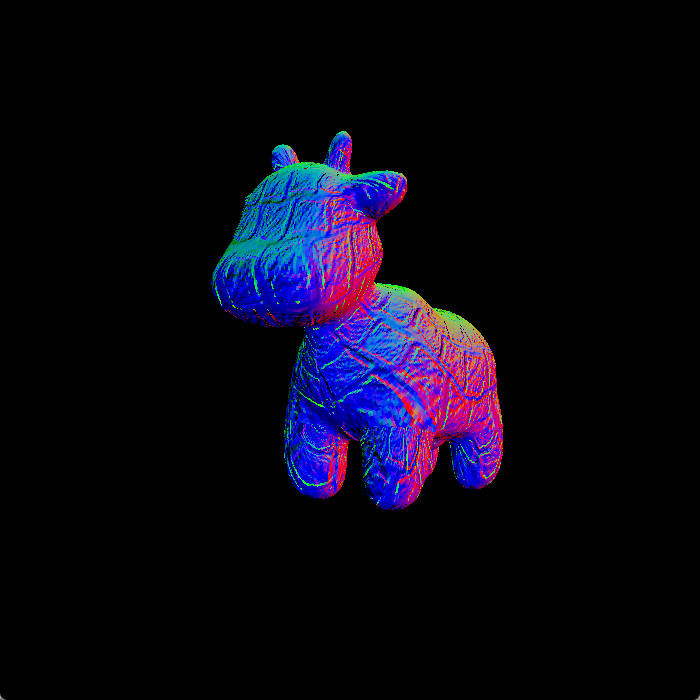
bump_fragment_shader()。在gpt的帮助下,弄懂了bump mapping,目标就是修改法向量,根据凹凸贴图来计算在(u,v)位置下的梯度,公式在框架中给出了,其中h函数的意思就是求height,那么height是怎么来的呢。首先,凹凸贴图其实存的是三通道rgb值,只需要求出这个三维向量的绝对值也就是长度,那么就是高度。其中tbn矩阵是一个局部坐标系(其实这么说也不太准确),通过这个矩阵可以将计算出来的在局部坐标系下的法线转换成世界坐标系下。还有一点是,颜色直接取凹凸图就好
1
2
3
4
5
6
7
8
9
10
11
12
13
14
15
16
17
18
19
20
21
22
23
24
25
26
27
28
29
30
31
32
33
34
35
36
37
38
39
40
41
42
43
44
45
46
Eigen::Vector3f bump_fragment_shader(const fragment_shader_payload& payload)
{

    Eigen::Vector3f ka = Eigen::Vector3f(0.005, 0.005, 0.005);
    Eigen::Vector3f kd = payload.color;
    Eigen::Vector3f ks = Eigen::Vector3f(0.7937, 0.7937, 0.7937);

    auto l1 = light{ {20, 20, 20} , {500, 500, 500} } ;
    auto l2 = light{ {-20, 20, 0} , {500, 500, 500} } ;

    std::vector<light> lights = {l1, l2};
    Eigen::Vector3f amb_light_intensity{10, 10, 10};
    Eigen::Vector3f eye_pos{0, 0, 10};

    float p = 150;

    Eigen::Vector3f color = payload.color;
    Eigen::Vector3f point = payload.view_pos;
    Eigen::Vector3f normal = payload.normal;

    float kh = 0.2, kn = 0.1;
    float u = payload.tex_coords[0], v = payload.tex_coords[1];
    float width,height;
    if (payload.texture)
    {
        width = payload.texture->width;
        height = payload.texture->height;
    }
    auto n = normal;
    Vector3f t(n.x() * n.y() / sqrt(n.x() * n.x() + n.z() * n.z()), sqrt(n.x() * n.x() + n.z() * n.z()), n.z() * n.y() / sqrt(n.x() * n.x() + n.z() * n.z()));
    auto b = n.cross(t);
    Eigen::Matrix3f TBN;
    TBN.col(0) = t;
    TBN.col(1) = b;
    TBN.col(2) = n;
    auto dU = kh * kn * (payload.texture->getColor(u + 1.f / width, v).norm() - payload.texture->getColor(u, v).norm());
    auto dV = kh * kn * (payload.texture->getColor(u , v + 1.f/height).norm() - payload.texture->getColor(u, v).norm());
    Eigen::Vector3f ln(-dU, -dV, 1.f);
    n = (TBN * ln).normalized();


    Eigen::Vector3f result_color = { 0, 0, 0 };
    result_color = n;

    return result_color * 255.f;
}
- 第六,
实现displacement_fragment_shader()。实现了凹凸映射,那位移映射也就简单了,直接把点修改下就好,最后再加个phong着色就行
1
2
3
4
5
6
7
8
9
10
11
12
13
14
15
16
17
18
19
20
21
22
23
24
25
26
27
28
29
30
31
32
33
34
35
36
37
38
39
40
41
42
43
44
45
46
47
48
49
50
51
52
53
54
55
56
57
58
59
60
61
62
63
64
65
Eigen::Vector3f displacement_fragment_shader(const fragment_shader_payload& payload)
{

    Eigen::Vector3f ka = Eigen::Vector3f(0.005, 0.005, 0.005);
    Eigen::Vector3f kd = payload.color;
    Eigen::Vector3f ks = Eigen::Vector3f(0.7937, 0.7937, 0.7937);

    auto l1 = light{ {20, 20, 20} , {500, 500, 500} } ;
    auto l2 = light{ {-20, 20, 0} , {500, 500, 500} } ;

    std::vector<light> lights = {l1, l2};
    Eigen::Vector3f amb_light_intensity{10, 10, 10};
    Eigen::Vector3f eye_pos{0, 0, 10};

    float p = 150;

    Eigen::Vector3f color = payload.color;
    Eigen::Vector3f point = payload.view_pos;
    Eigen::Vector3f normal = payload.normal;

    float kh = 0.2, kn = 0.1;
    //储存该片元在纹理上的uv坐标
    float u = payload.tex_coords[0], v = payload.tex_coords[1], w = payload.texture->width, h = payload.texture->height;
    float x = normal.x(), y = normal.y(), z = normal.z();
    //计算t向量tangent
    Vector3f t(x * y / sqrt(x * x + z * z), sqrt(x * x + z * z), z * y / sqrt(x * x + z * z));
    auto b = normal.cross(t);//b向量binormal
    Eigen::Matrix3f TBN;
    TBN.col(0) = t;
    TBN.col(1) = b;
    TBN.col(2) = normal;
    //计算在凹凸贴图上uv的梯度
    auto dU = kh * kn * (payload.texture->getColor(u + 1 / w, v).norm() - payload.texture->getColor(u, v).norm());
    auto dV = kh * kn * (payload.texture->getColor(u, v + 1 / h).norm() - payload.texture->getColor(u, v).norm());
    //根据梯度计算出的在tbn坐标系下的法线方向
    Eigen::Vector3f ln(-dU, -dV, 1.f);
    point += (kn * normal * payload.texture->getColor(u, v).norm());
    normal = (TBN * ln).normalized();


    Eigen::Vector3f result_color = {0, 0, 0};

    for (auto& light : lights)
    {
        // TODO: For each light source in the code, calculate what the *ambient*, *diffuse*, and *specular*
        // components are. Then, accumulate that result on the *result_color* object.
        Eigen::Vector3f l = light.position - point;//光照方向同时也是光源到着色点的偏移向量
        Eigen::Vector3f v = eye_pos - point;//注视方向
        float r = l.squaredNorm();//计算光源到着色点的距离
        l = l.normalized();
        v = v.normalized();
        Eigen::Vector3f h = v + l;
        h = h.normalized();

        Eigen::Vector3f ambient = ka.cwiseProduct(amb_light_intensity);
        Eigen::Vector3f diffuse = kd.cwiseProduct(light.intensity /r)* std::max(0.f, normal.dot(l));
        Eigen::Vector3f specular = ks.cwiseProduct(light.intensity/r) * pow(std::max(0.f, normal.dot(h)), 100);

        result_color += (ambient + diffuse + specular);

    }

    return result_color * 255.f;
}
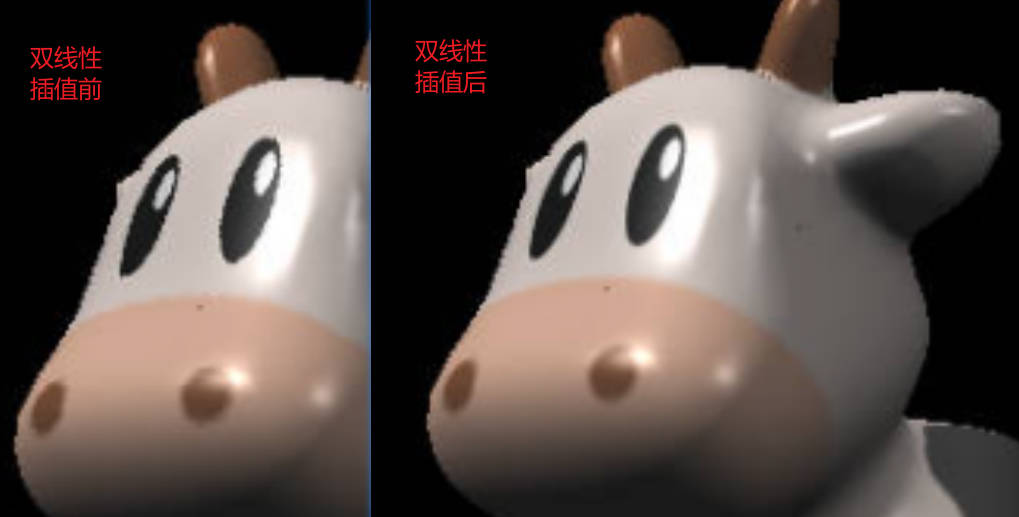
- 第七,双线性插值。为了实现我的思路,我还重载了
getColor()函数。先说双线性插值,我是根据那个点所在的位置来取离它最近的三个点,也就是说这个原本的点可能在四个点的左下角、右下角、左上角、右上角。因为我需要算出是哪四个像素,也就是拿到了四个像素的下标,但是原来的getColor()函数是传入浮点型并且小于1的uv,所以我就重载了形参为int的getColor()函数
1
2
3
4
5
6
7
8
9
10
11
12
13
14
15
16
17
18
19
20
21
22
23
24
25
26
27
28
29
30
31
32
33
34
35
36
37
38
39
40
41
42
 Eigen::Vector3f getColorBilinear(float u, float v)
    {
        int u_img = static_cast<int>(u * width);
        int v_img = static_cast<int>((1 - v) * height);
        //去找周围的点坐标
        int x, y;
        Eigen::Vector3f color[4];
        color[0] = getColor(u_img, v_img);
        float s = (u * (float)width - ((float)u_img + 0.5));
        if (s > 0)
        {
            //x = u + 1.f / width >= 1.f ? 1.f : u + 1.f / width;
            x = u_img + 1 >= width ? width - 1 : u_img + 1;
        }
        else
        {
            x = u_img - 1 < 0 ? 0 : u_img - 1;
            //x = u - 1.f / width < 0.f ? 0.f : u - 1.f / width;
        }
        color[1] = getColor(x, v_img);
        auto c1 = lerp(s, color[0], color[1]);//水平方向相邻两个颜色的插值结果

        float t = (1 - v) * (float)height - ((float)v_img + 0.5);
        if (t > 0)
        {
            y = v_img + 1 >= height ? height - 1 : v_img + 1;
            //y = v + 1.f / height >= 1.0f ? 1.0f : v + 1.f / height;
        }
        else
        {
            y = v_img - 1 < 0 ? 0 : v_img - 1;
            //y = v - 1.f / height < 0.f ? 0.f : v - 1.f / height;
        }
        color[2]= getColor(u_img, y);
        color[3] = getColor(x, y);
        auto c2 = lerp(t, color[2], color[3]);//水平方向相邻两个颜色的插值结果(原像素下面一行或者上面一行的结果)


        return lerp(t, c1, c2);
    }

};
- 重载的
getColor()函数:
1
2
3
4
5
6
7
8
9
    Eigen::Vector3f getColor(int u, int v)
    {
        if (u < 0) u = 0;
        if (u >= width) u = width - 1;
        if (v < 0) v = 0;
        if (v >= height) u = height - 1;
        auto color = image_data.at<cv::Vec3b>(v, u);
        return Eigen::Vector3f(color[0], color[1], color[2]);
    }
- lerp()函数。为什么取绝对值,这事因为,我把t的绝对值当成四个当中一个像素对最终颜色的贡献大小,如果t是0.2,说明真实的坐标,距离原本的那个像素c1(不考虑双线性插值的像素)更近所以贡献更大所以是0.8c1,距离相邻的那个像素c2是0.8,距离更远,所以贡献更小,所以是0.2c2
1
2
3
4
    Eigen::Vector3f lerp(float t, Eigen::Vector3f c1, Eigen::Vector3f c2)
    {
        return (c1 + (c2 - c1) * abs(t));
    }