一、基础动态光照原理
1.光源
需要写一个光源的shader,光源的计算方式如下:
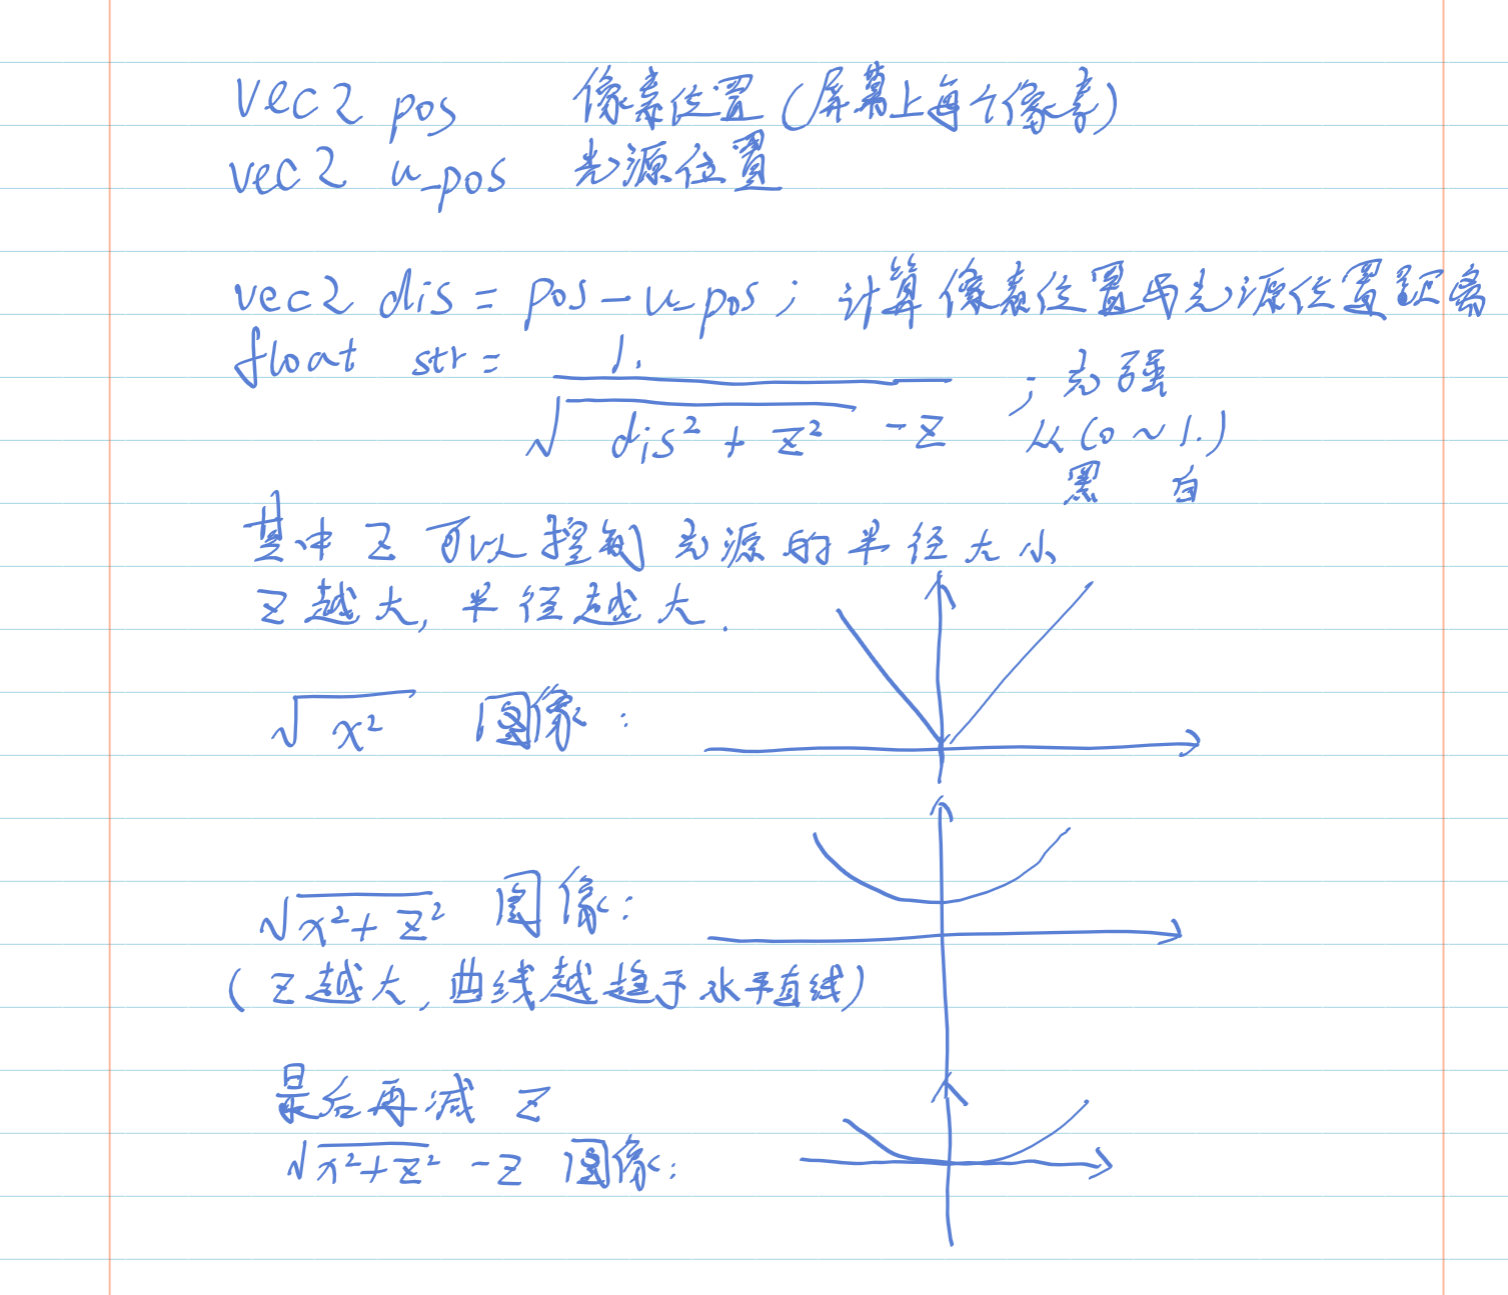
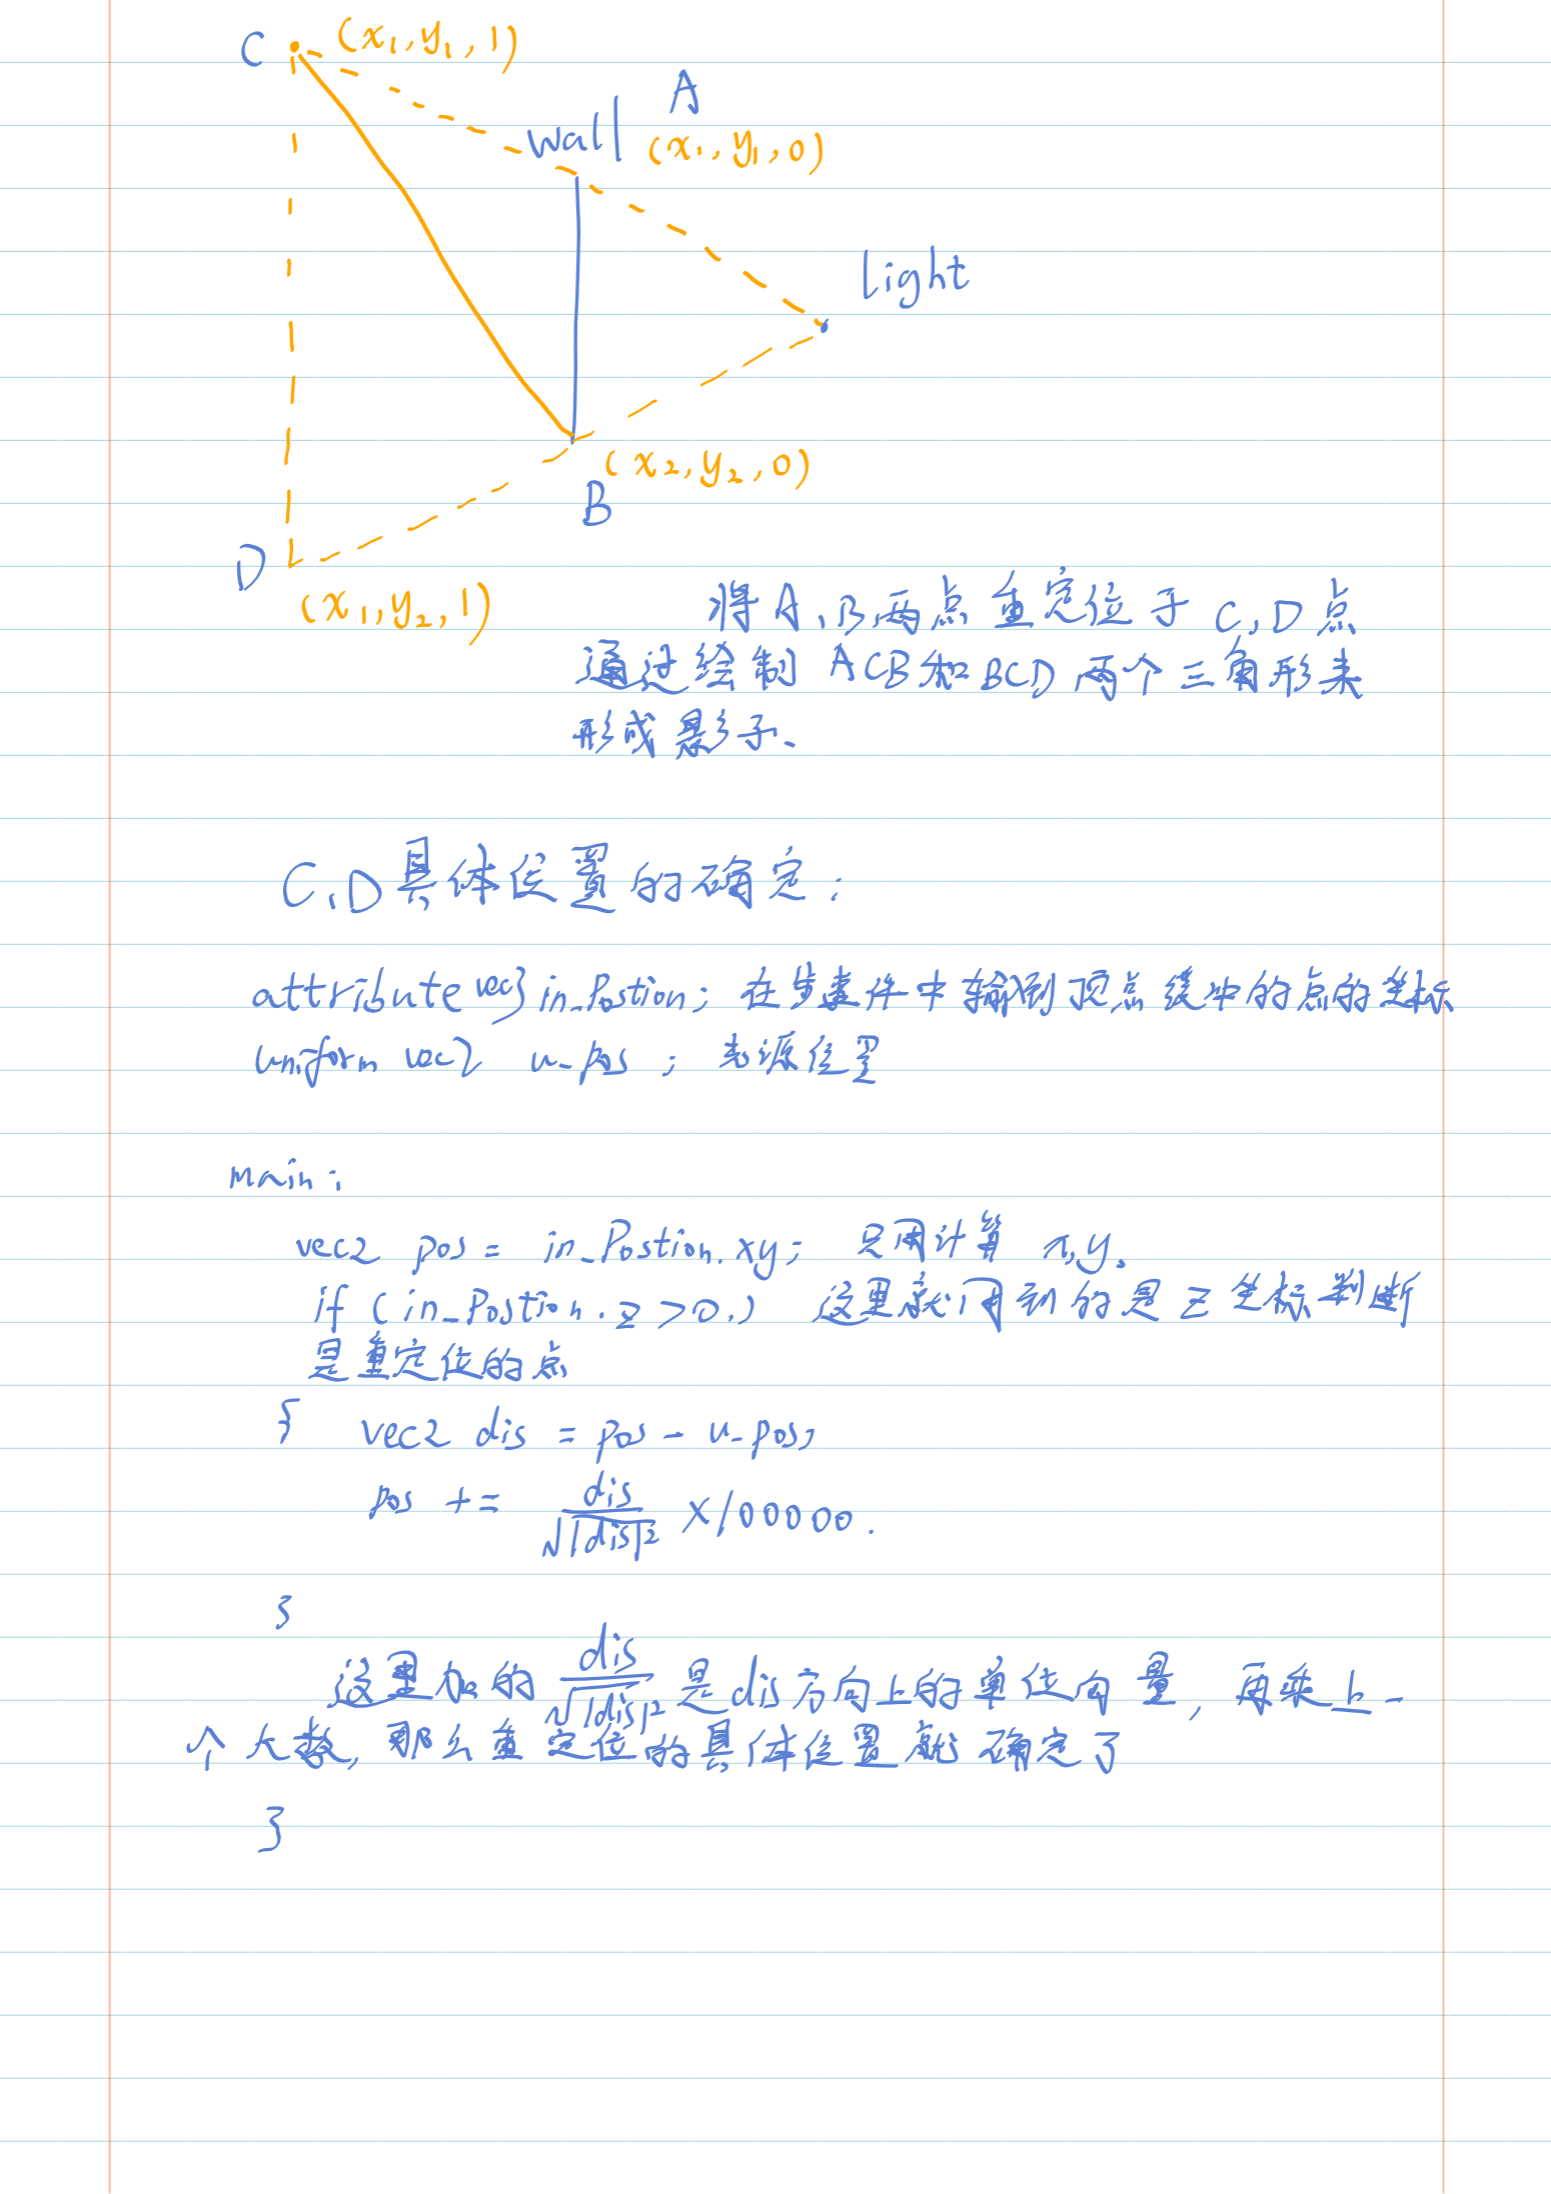
2.影子计算
计算方式与解析如图:
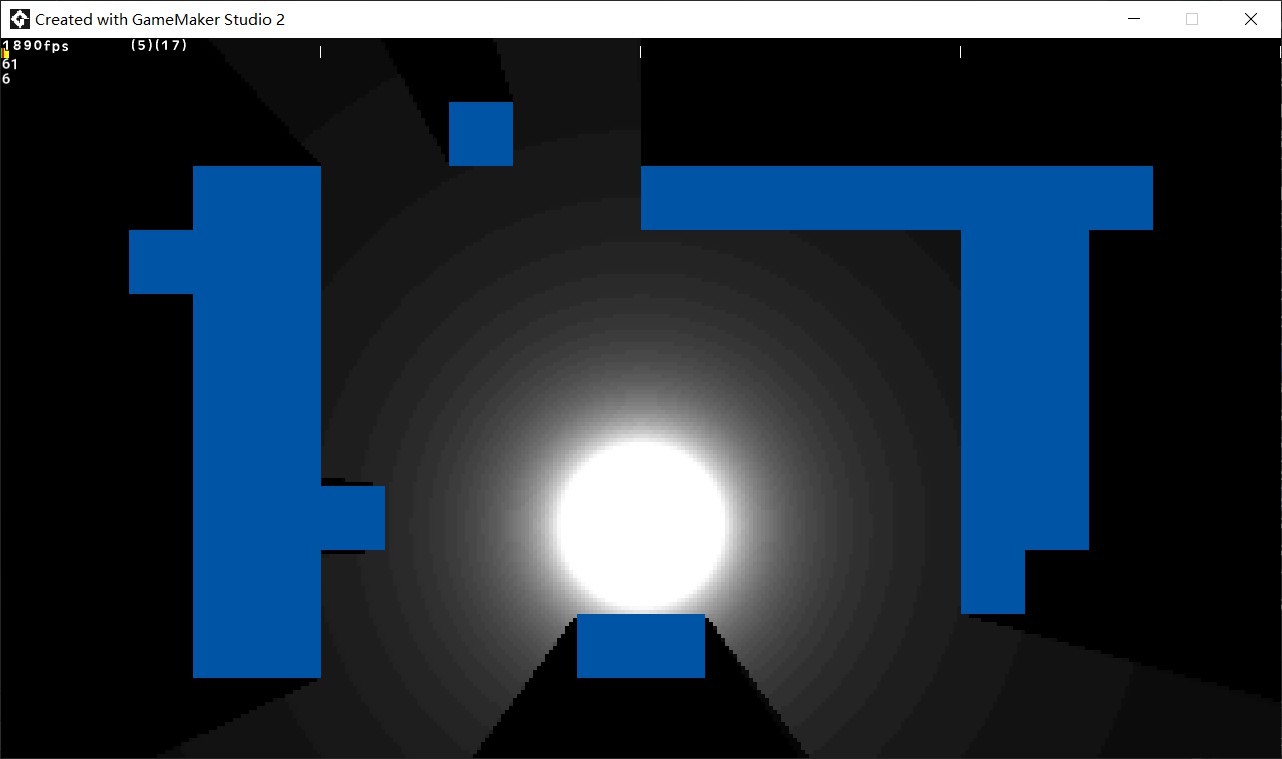
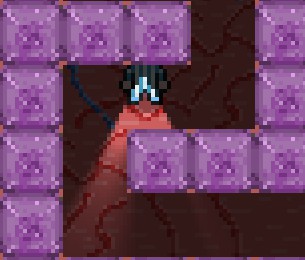
3.新的光源的影子盖住旧光源的问题
开启z缓冲,将影子变为透明的存在,并置于自己对应的光照上面。如下图:
二、基础动态光照代码实现
1.shader的编写
创建一个shader作为光源 shd_light
顶点着色器vsh:
1
2
3
4
5
6
7
8
9
10
11
12
attribute vec3 in_Position;                  // (x,y,z)

varying vec2 pos;

uniform float u_z; //z缓冲深度

void main(){
    vec4 object_space_pos = vec4( in_Position.x, in_Position.y, u_z, 1.0);
    gl_Position = gm_Matrices[MATRIX_WORLD_VIEW_PROJECTION] * object_space_pos;
    pos = in_Position.xy;

}
片段着色器fsh:
1
2
3
4
5
6
7
8
9
10
11
varying vec2 pos; //当前像素位置

uniform vec2 u_pos; //光源位置

const float zz = 32.; //larger zz, larger light

void main(){
    vec2 dis = pos - u_pos;
    float str = 1./(sqrt(dis.x*dis.x + dis.y*dis.y + zz*zz)-zz); //strength of light is the inverse distance
    gl_FragColor = vec4(vec3(str),1.);
}
创建一个shader作为阴影 shd_shadow
顶点着色器vsh:
1
2
3
4
5
6
7
8
9
10
11
12
13
14
15
attribute vec3 in_Position;                  // (x,y,z)

uniform vec2 u_pos; //光源位置
uniform float u_z;  //z缓冲深度

void main(){
    vec2 pos = in_Position.xy;

    if (in_Position.z > 0.){ //check if vertex requires repositioning
        vec2 dis = pos - u_pos;
        pos += dis/sqrt(dis.x*dis.x + dis.y*dis.y) * 100000.; //重定位z缓冲小于0的点
    }
    vec4 object_space_pos = vec4( pos.x, pos.y, u_z-0.5, 1.0); //阴影绘制在u_z-0.5的深度,而其对应的光照在u_z的深度,所以,阴影在光照的上一层,这样才不会被自己的光照盖住
    gl_Position = gm_Matrices[MATRIX_WORLD_VIEW_PROJECTION] * object_space_pos;
}
片段着色器fsh:
1
2
3
void main(){
    gl_FragColor = vec4(0.); //绘制一个黑色透明的阴影
}
2. 初始化代码(逻辑、计算、z缓冲)
先创建一个obj_light作为光源物体,再创建一个obj_light的子物体obj_movinglight设置为可移动的光源。
创建obj_setup添加控制动态光照系统的代码
在obj_setup中添加创建事件:
1
2
3
4
5
6
7
8
9
10
11
12
13
14
15
//重置surface
surface_resize(application_surface,320,180);
display_set_gui_maximize();

//shader中变量获取
u_pos = shader_get_uniform(shd_light,"u_pos");
u_pos2 = shader_get_uniform(shd_shadow,"u_pos");
u_z = shader_get_uniform(shd_light,"u_z");
u_z2 = shader_get_uniform(shd_shadow,"u_z");

//顶点格式创建、顶点缓冲初始化
vertex_format_begin();
vertex_format_add_position_3d();
vf = vertex_format_end();
vb = vertex_create_buffer();
在obj_setup中添加步事件:
1
2
3
4
5
6
7
8
9
10
11
12
13
14
15
16
17
18
19
20
21
22
23
24
25
26
//创建由两个三角形构成的四边形,用来制作影子
//z坐标来判断顶点是否需要重定位
function Quad(_vb,_x1,_y1,_x2,_y2){
    //上面的三角形
    vertex_position_3d(_vb,_x1,_y1,0);
    vertex_position_3d(_vb,_x1,_y1,1); //repositioned vertex
    vertex_position_3d(_vb,_x2,_y2,0);

    //下面的三角形
    vertex_position_3d(_vb,_x1,_y1,1); //repositioned vertex
    vertex_position_3d(_vb,_x2,_y2,0);
    vertex_position_3d(_vb,_x2,_y2,1); //repositioned vertex
}


//为每一面墙壁构建顶点缓冲器
//使用墙的两条对角线而不是四条边
//(优化)
vertex_begin(vb,vf);
var _vb = vb;
with(obj_wall){
    Quad(_vb,x,y,x+sprite_width,y+sprite_height); //墙的一条对角线
    Quad(_vb,x+sprite_width,y,x,y+sprite_height); //墙的另一条对角线
}
vertex_end(vb);
在obj_setup中添加draw事件,绘制光源和阴影
1
2
3
4
5
6
7
8
9
10
11
12
13
14
15
16
17
18
19
20
21
22
23
24
25
26
27
28
29
30
31
32
//局部变量初始化
var _u_pos = u_pos;
var _u_pos2 = u_pos2;
var _u_z = u_z;
var _u_z2 = u_z2;
var _vb = vb;

//开启z缓冲 (3D)
gpu_set_ztestenable(1);
gpu_set_zwriteenable(1);
var _z = 0;//初始化z缓冲的深度值
with(obj_light){

    //绘制阴影
    shader_set(shd_shadow);
    shader_set_uniform_f(_u_pos2,x,y);
    shader_set_uniform_f(_u_z2,_z);
    vertex_submit(_vb,pr_trianglelist,-1);

    //绘制光
    gpu_set_blendmode(bm_add);//打开叠加模式
    shader_set(shd_light);
    shader_set_uniform_f(_u_pos,x,y);
    shader_set_uniform_f(_u_z,_z);
    draw_rectangle(0,0,320,180,0); //绘制光的画布
    gpu_set_blendmode(bm_normal);

    _z--; //下一个光源和其对应的影子在这一个的上方
}
shader_reset();
gpu_set_ztestenable(0);
gpu_set_zwriteenable(0);
二、动态光照系统的完善(原理)
1.混合模式方法取代z缓冲
使用gamemaker studio2的混合模式函数gpu_set_blendmode_ext_sepalpha()。
该函数一共有四个参数:[1] 源像素RGB混合模式[2] 目标像素RGB混合模式[3] 源像素透明度混合模式[4] 目标像素透明度混合模式。
在绘制阴影前,调用(此时应当把阴影片段着色器的颜色改为1.)gpu_set_blendmode_ext_sepalpha(bm_zero,bm_one,bm_one,bm_zero);
这意味着源像素RPG(也就是阴影的颜色)要乘以0,目标像素RPG是不变的(乘以1),源像素的透明度(也就是阴影的透明度)乘以1,目标像素透明度乘以0。
在绘制光源前,调用gpu_set_blendmode_ext_sepalpha(bm_inv_dest_alpha,bm_one,bm_zero,bm_zero);
第一个参数bm_inv_dest_alpha意思是(1 - 目标像素透明度),也就是说当某个地方透明度为0(没有阴影)才会绘制光源 源像素,并且目标像素RPG不变,因为光源可以叠加,但源像素的透明度和目标像素的透明度都乘以0,是为了重置surface的透明度以保证RGB值得保留。
2.弱光灯效果
在上面的基础上,提前创建一个表面surface,所有的光和阴影绘制完毕后,开始绘制整个表面,绘制表面前调用gpu_set_blendmode_ext(bm_zero,bm_src_color);
这意味着源像素RGB值(也就是阴影)乘以0,说明是黑色,目标像素RGB值就是原来的颜色(比如地板的颜色,依旧不变)
新建sha_shadsurf,修改片段着色器以达到弱光灯的效果,其实就是将片段着色器的alpha通道改为1。
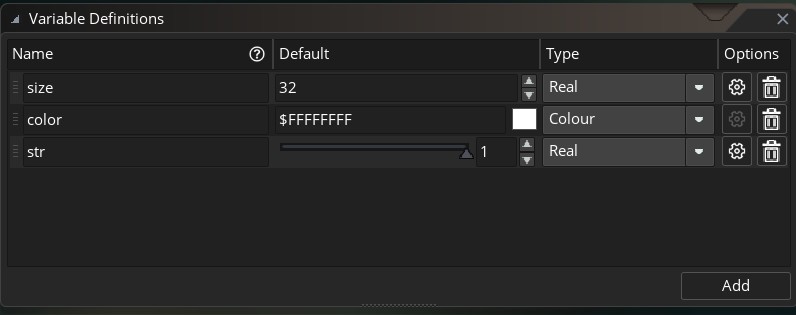
3.可修改光源参数
在obj_light中添加变量,如颜色、半径、角度参数,在shader中修改uniform变量即可。
四、动态光照系统的完善代码实现
修改obj_setup的创建事件:
1
2
3
4
5
6
7
8
9
10
11
12
13
14
15
16
17
18
19
20
21
22
23
24
25
//Resize the application surface to be lower res (for pixel games + performance boost)
surface_resize(application_surface,320,180);
display_set_gui_maximize();

//turn of automaic drawing of application surface
application_surface_draw_enable(false);

//view coordinates
vx = 0;
vy = 0;

//Shader uniform variable setup
u_pos = shader_get_uniform(shd_light,"u_pos");
u_zz = shader_get_uniform(shd_light,"zz");
u_str = shader_get_uniform(shd_light,"u_str");
u_pos2 = shader_get_uniform(shd_shadow,"u_pos");

//Vertex format and buffer setup
vertex_format_begin();
vertex_format_add_position_3d();
vf = vertex_format_end();
vb = vertex_create_buffer();

//shadow surface variable declaration
shad_surf = noone;
修改obj_setup的步事件: (代码中有控制摄像机移动的代码,并且对传入顶点着色器的参数进行了修改)
1
2
3
4
5
6
7
8
9
10
11
12
13
14
15
16
17
18
19
20
21
22
23
24
25
26
27
28
29
30
31
32
33
34
35
36
37
38
39
40
41
42
//Creates Quad with two triangles. Used to make the shadows.
//Z coordinate is used as a flag to determine if the vertex will be repositioned in the shader
function Quad(_vb,_x1,_y1,_x2,_y2){
    //Upper triangle
    vertex_position_3d(_vb,_x1,_y1,0);
    vertex_position_3d(_vb,_x1,_y1,1); //repositioned vertex
    vertex_position_3d(_vb,_x2,_y2,0);

    //Lower Triangle
    vertex_position_3d(_vb,_x1,_y1,1); //repositioned vertex
    vertex_position_3d(_vb,_x2,_y2,0);
    vertex_position_3d(_vb,_x2,_y2,1); //repositioned vertex
}


//Construct the vertex buffer with every wall
//Instead of using the four edges as the walls, we use the diagonals instead (Optimization)
vertex_begin(vb,vf);
var _vb = vb;
with(obj_wall){
    Quad(_vb,x,y,x+sprite_width,y+sprite_height); //Negative Slope Diagonal Wall
    Quad(_vb,x+sprite_width,y,x,y+sprite_height); //Positive Slope Diagonal Wall
}
vertex_end(vb);


//view movement controls
vy += (keyboard_check(vk_down)-keyboard_check(vk_up))*4;
vx += (keyboard_check(vk_right)-keyboard_check(vk_left))*4;
camera_set_view_pos(view_camera[0],vx,vy);


//add lights by left clicking. For testing purposes
if (mouse_check_button_pressed(mb_left)){
        instance_create_depth(mouse_x,mouse_y,depth,obj_light);
}
if (mouse_check_button_pressed(mb_right)){
    repeat(100)
        instance_create_depth(mouse_x,mouse_y,depth,obj_light);
}
添加draw_begin事件,这是为了确保每一帧最初会清除掉application_surface
1
draw_clear_alpha(c_black,0);
修改Draw事件:(里面包含了摄像机移动时,坐标的变换)
1
2
3
4
5
6
7
8
9
10
11
12
13
14
15
16
17
18
19
20
21
22
23
24
25
26
27
28
29
30
31
32
33
34
35
36
37
38
39
40
41
42
43
44
45
46
//Local variables setup
var _u_pos = u_pos;
var _u_zz = u_zz;
var _u_str = u_str;
var _u_pos2 = u_pos2;
var _vb = vb;
var _vx = vx;
var _vy = vy;

//Shadow surface setup
if (!surface_exists(shad_surf)){
    shad_surf = surface_create(320,180);
}

matrix_set(matrix_world,matrix_build(-vx,-vy,0,0,0,0,1,1,1));
surface_set_target(shad_surf);
draw_clear_alpha(c_black,0);
with(obj_light){

    //Draw the shadows (AKA light blockers)
    gpu_set_blendmode_ext_sepalpha(bm_zero,bm_one,bm_one,bm_zero);
    shader_set(shd_shadow);
    shader_set_uniform_f(_u_pos2,x,y);
    vertex_submit(_vb,pr_trianglelist,-1);

    //Draw the Light
    gpu_set_blendmode_ext_sepalpha(bm_inv_dest_alpha,bm_one,bm_zero,bm_zero);
    shader_set(shd_light);
    shader_set_uniform_f(_u_pos,x,y);
    shader_set_uniform_f(_u_zz,size);
    shader_set_uniform_f(_u_str,str);
    draw_rectangle_color(_vx,_vy,_vx+320,_vy+180,color,color,color,color,0); //canvas for drawing the light
}
surface_reset_target();
matrix_set(matrix_world,matrix_build(0,0,0,0,0,0,1,1,1));


//Draw and blend the shadow surface to the application surface
gpu_set_blendmode_ext(bm_zero,bm_src_color);
shader_set(shd_shadsurf);
draw_surface_ext(shad_surf,vx,vy,1,1,0,c_white,0.8);


//reset shader and blendmode
shader_reset();
gpu_set_blendmode(bm_normal);
添加post -Draw事件:
每一帧先画背景,再画application_surface,这样的话背景不受光照的影响
1
2
draw_clear_alpha(c_teal,1);
draw_surface_ext(application_surface,0,0,4,4,0,c_white,1);
修改shd_light的片段着色器fsh:
添加uniform变量,用于调整光源的属性。
1
2
3
4
5
6
7
8
9
10
11
12
varying vec2 pos; //current pixel position
varying vec4 col;

uniform vec2 u_pos; //light source positon

uniform float zz; //larger zz, larger light
uniform float u_str;
void main(){
    vec2 dis = pos - u_pos;
    float str = 1./(sqrt(dis.x*dis.x + dis.y*dis.y + zz*zz)-zz)*u_str; //strength of light is the inverse distance
    gl_FragColor = col*vec4(vec3(str),1.);
}
创建表面的着色器,sh_shadsurf,仅修改片段着色器fsh中透明度即可。
注释掉的代码和最后一行代码的功效一样。
1
2
3
4
5
6
7
8
varying vec2 v_vTexcoord;
varying vec4 v_vColour;

void main(){
    //vec4 frag = texture2D( gm_BaseTexture, v_vTexcoord );
   // gl_FragColor = vec4(vec3(v_vColour.a * frag.rgb + 1.-v_vColour.a),1.); //change the scale of the light intensity then translate it to have max rgb value at pure white
    gl_FragColor = vec4(texture2D( gm_BaseTexture, v_vTexcoord ).rgb,1.);
}
五、设置光照角度和阴影边缘柔化
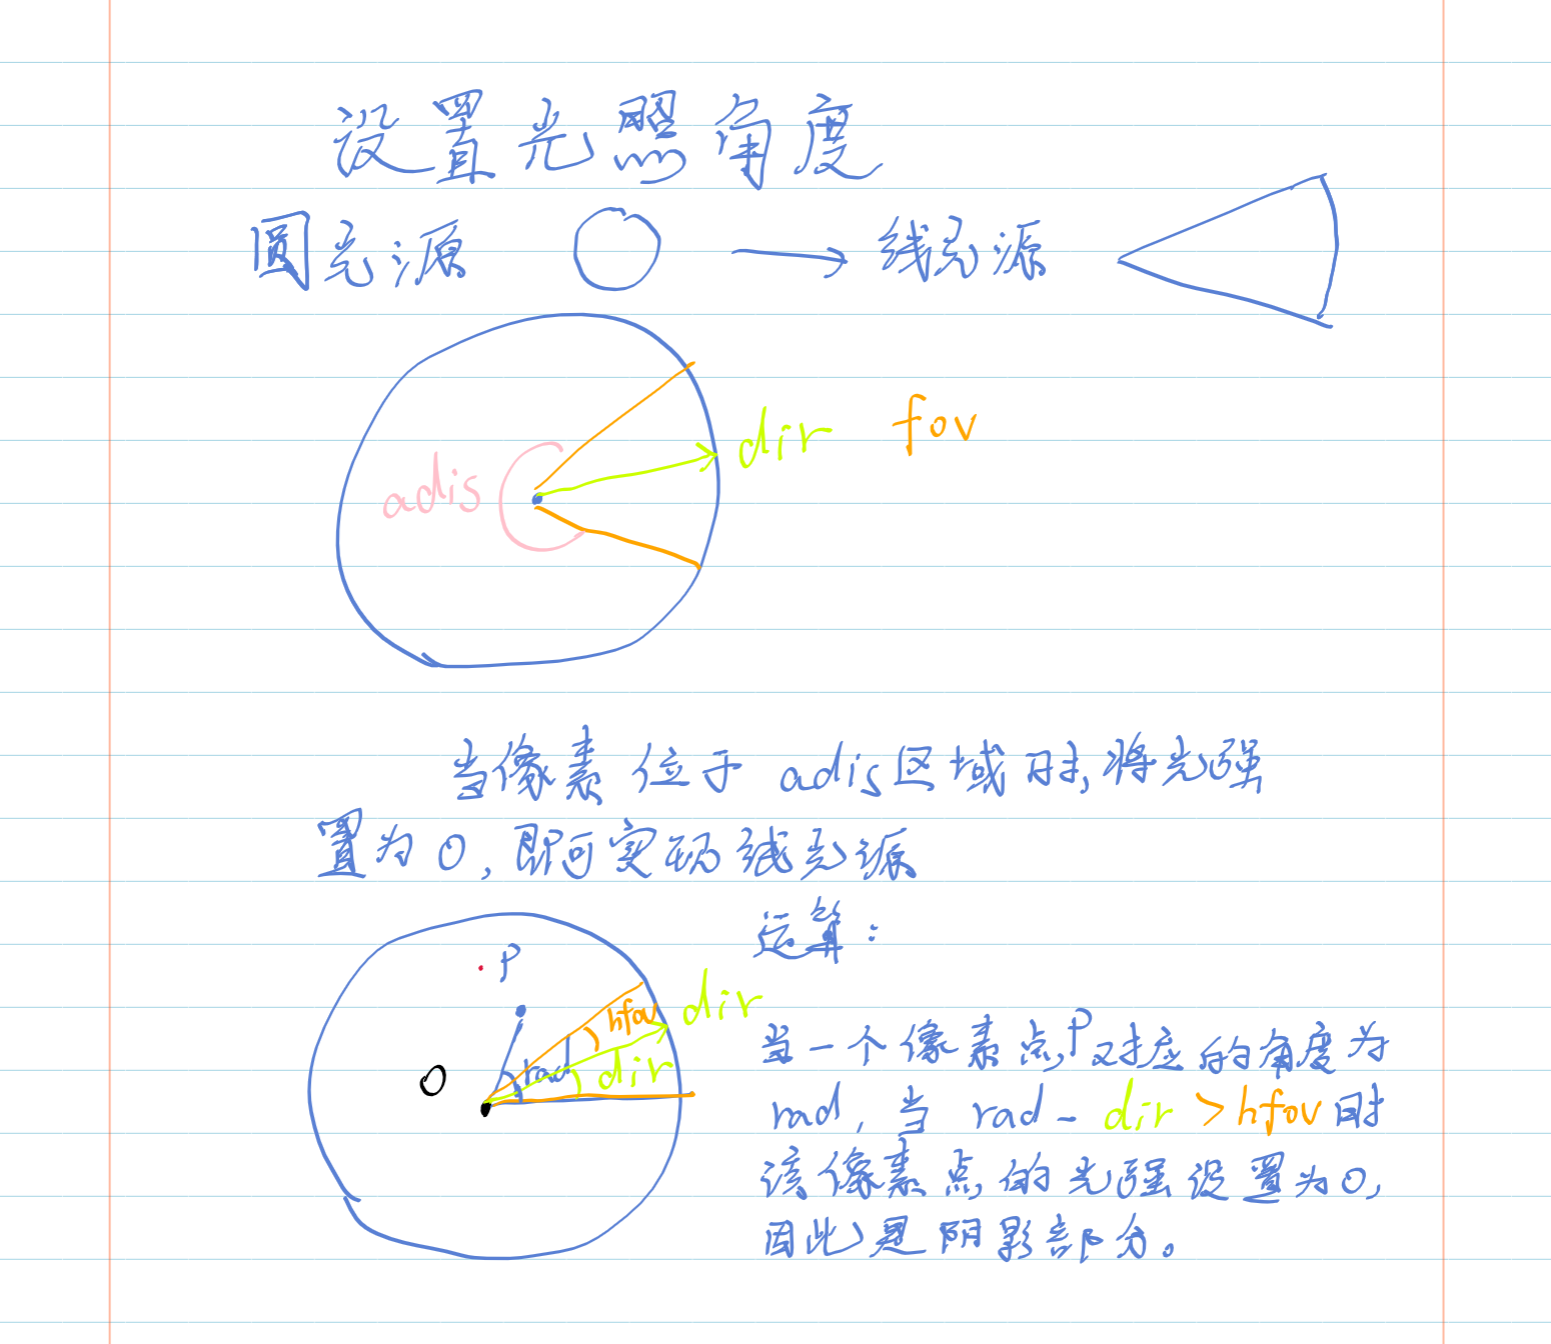
1.设置光照角度原理
如下图:
2.阴影边缘柔化
原理以及计算过程如下
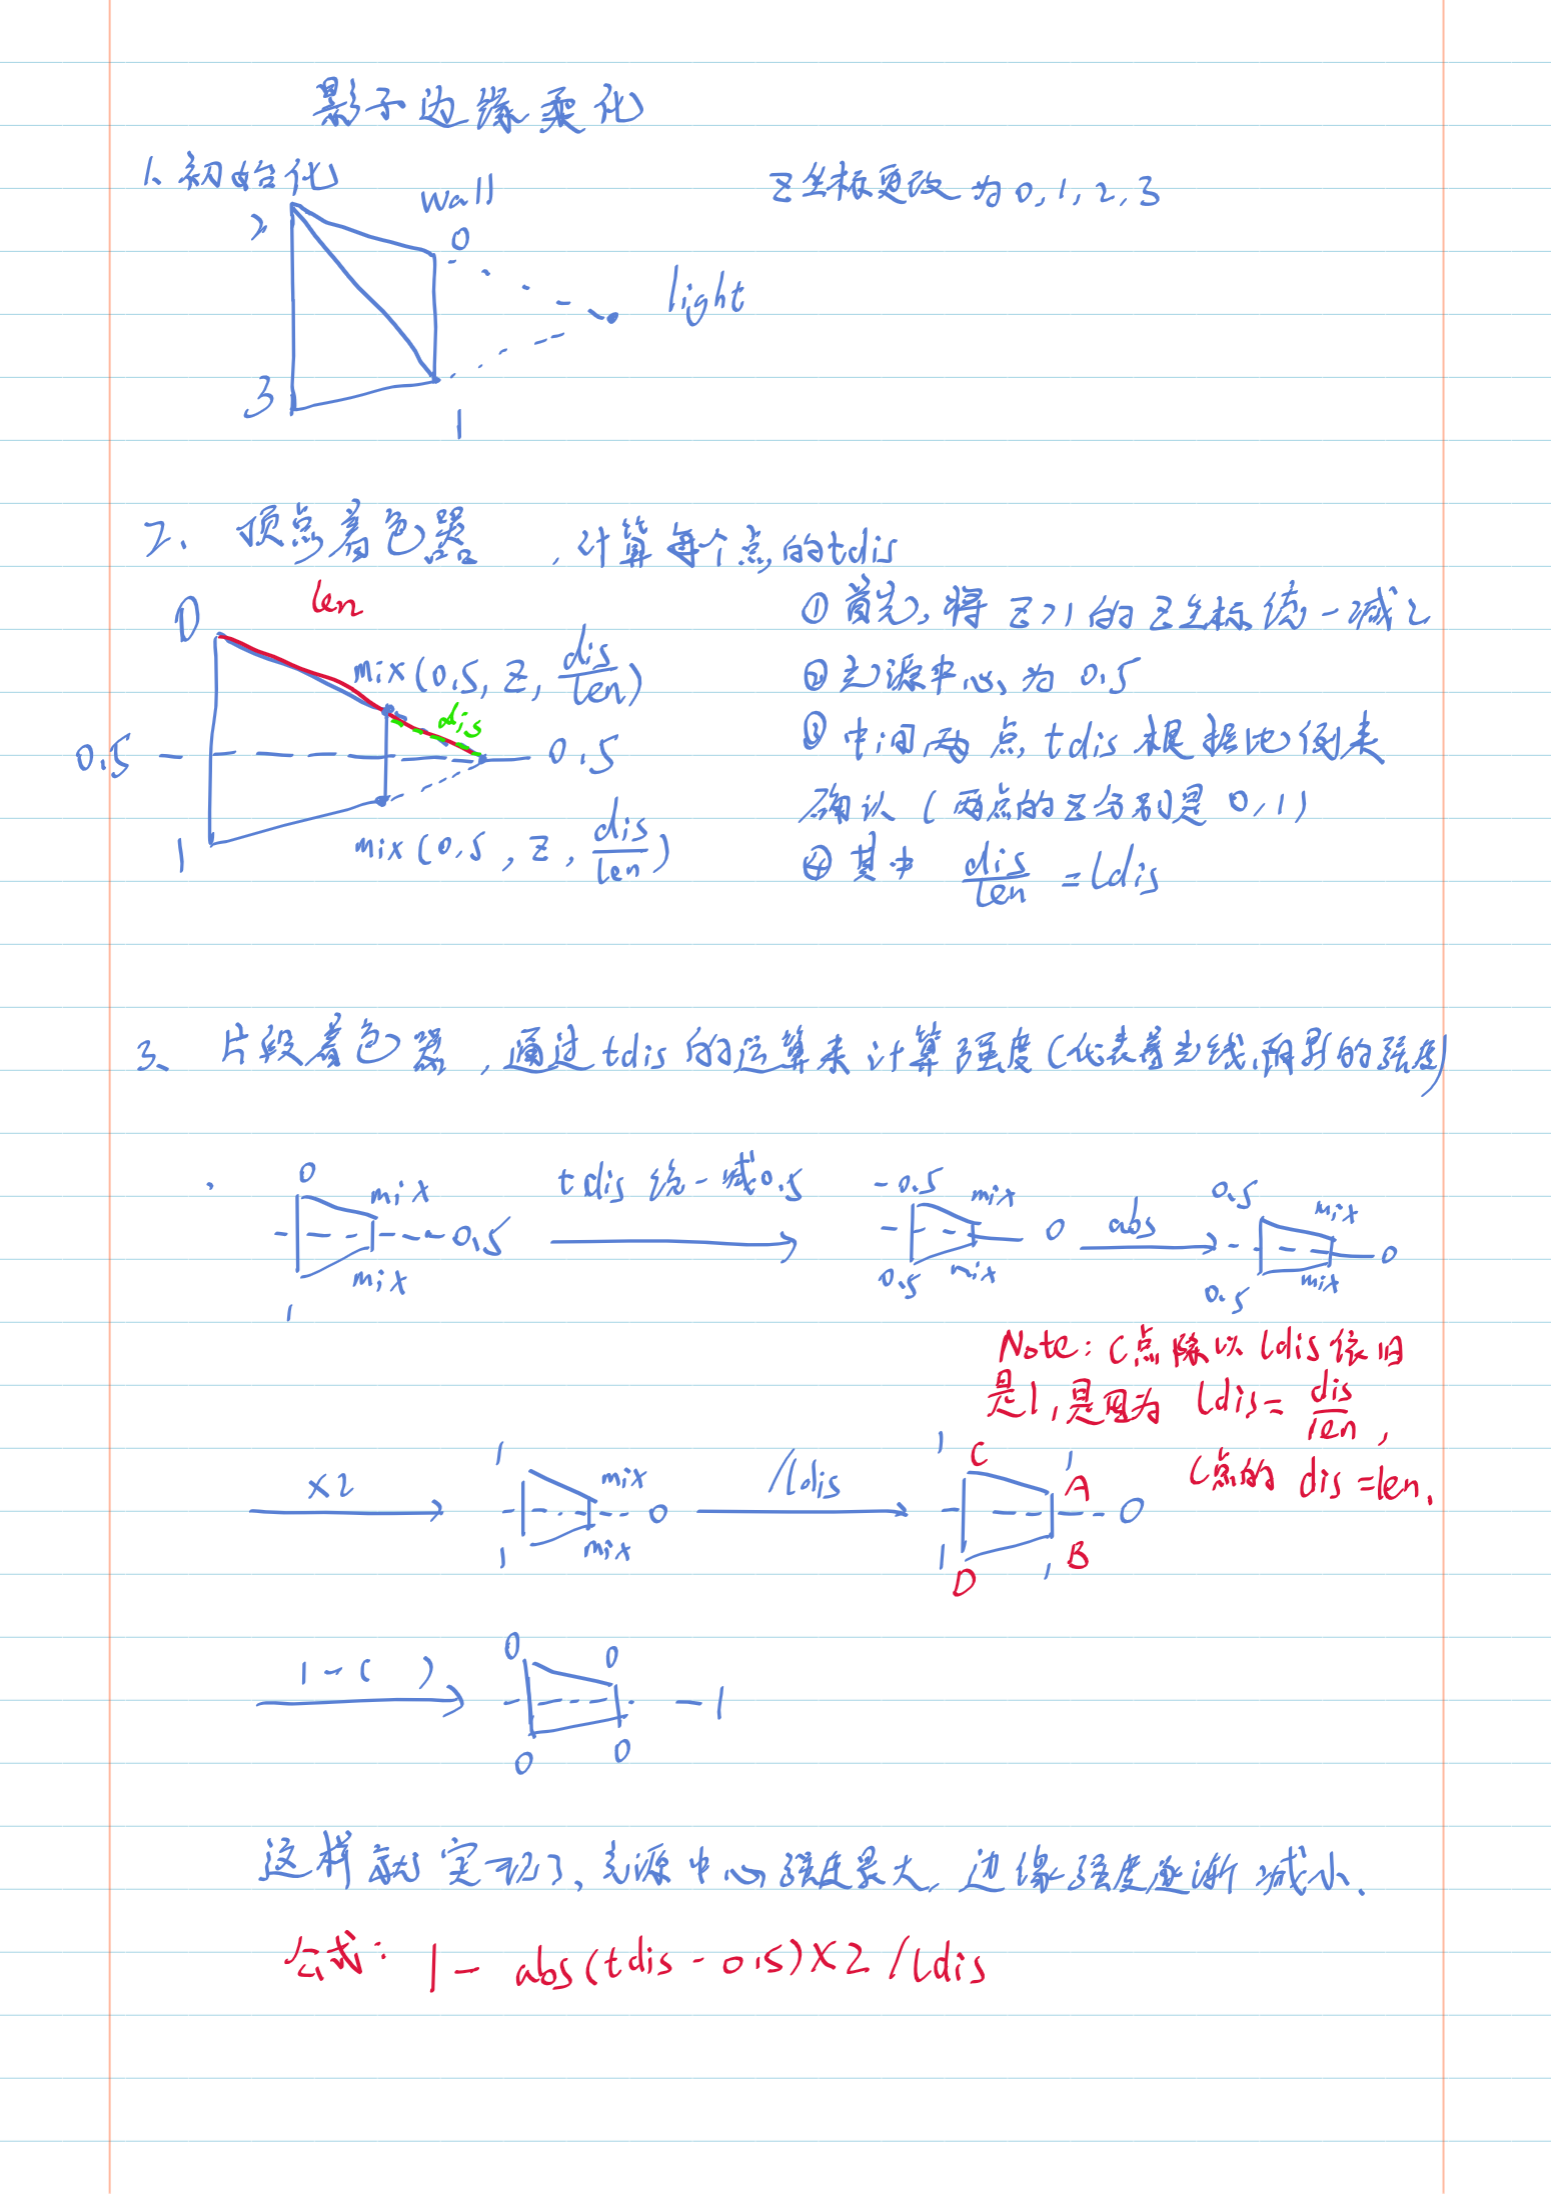
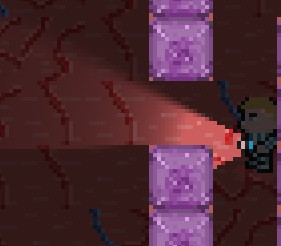
阴影边缘柔化前后对比:
六、代码实现设置光照角度和阴影边缘柔化
在olight物体中填加两个参数dir和fov用于调整光照的方向和角度的大小。
修改光源shader的片段着色器,实现可以调整的角度和方向,其中uniform变量需要在setup物体的创建事件中获取,在步事件中设置。
1
2
3
4
5
6
7
8
9
10
11
12
13
14
15
16
17
18
19
20
21
22
23
24
25
26
27
28
varying vec2 pos;
varying vec4 col;
uniform vec2 u_pos; //light的pos
uniform float zz;//zz越大,光衰减得越慢, 光源半径越大
uniform float u_str;
uniform float u_dir;
uniform float u_fov;
#define PI 3.14159265358
void main()
{
    vec2 dis = pos - u_pos;
    float str = 1./(sqrt(dis.x * dis.x + dis.y * dis.y + zz * zz) -zz) * u_str;//光照强度
    float dir = radians(u_dir);
    float hfov = radians(u_fov) * 0.5;

    if(hfov < PI)
    {
        float rad = atan(-dis.y, dis.x);
        float adis = abs(mod(rad + 2. * PI, 2. * PI) - dir);
        adis = min(adis, 2. * PI - adis);

        str *= clamp((1. - adis / hfov) * 5., 0., 1.);


    }
    gl_FragColor =col * vec4(vec3(str),1.);

}
修改阴影的顶点着色器,要通过运算得出tdis和ldis并传递给片段着色器中使用。
顶点着色器代码vsh:
1
2
3
4
5
6
7
8
9
10
11
12
13
14
15
16
17
18
19
20
21
22
23
24
25
26
27
28
29
//
// Simple passthrough vertex shader
//
attribute vec3 in_Position;//应该是buffer中的坐标也就是墙体的坐标                  // (x,y,z)
uniform vec2 u_pos;//指的是light的坐标
varying float ldis;
varying float tdis;
const float len = 100000.;
void main()
{
    vec2 pos = in_Position.xy;
    vec2 dis = pos - u_pos;
    float sdis = length(dis);
    if(in_Position.z > 1.)
    {
        //sqrt(dis.x * dis.x + dis.y * dis.y)指dis方向的单位矢量
        pos += dis / sdis * len;//指原来的点坐标 要加上dis方向*100000像素的 距离
        tdis = in_Position.z - 2.;
        ldis = 1.;
    }
    else
    {
        ldis = sdis / len;
        tdis = mix(0.5, in_Position.z, ldis);
    }
    vec4 object_space_pos = vec4( pos.x, pos.y, 0., 1.0);
    gl_Position = gm_Matrices[MATRIX_WORLD_VIEW_PROJECTION] * object_space_pos;

}
片段着色器代码fsh:
1
2
3
4
5
6
7
varying float tdis;
varying float ldis;
void main()
{
    float str = (1. - abs(tdis - 0.5) * 2. / ldis) * 5.;
    gl_FragColor = vec4(str);//vec3(0.)是黑色 1.是白色 //现在是透明的shadow
}
由于这次加了阴影的边缘柔化,所以在setup的绘制事件中,在绘制阴影之前将blendmode的最后一个参数从bm_zero改为bm_one,目的在于目标像素将透明度的系数改为1,这样的话阴影可以叠加。
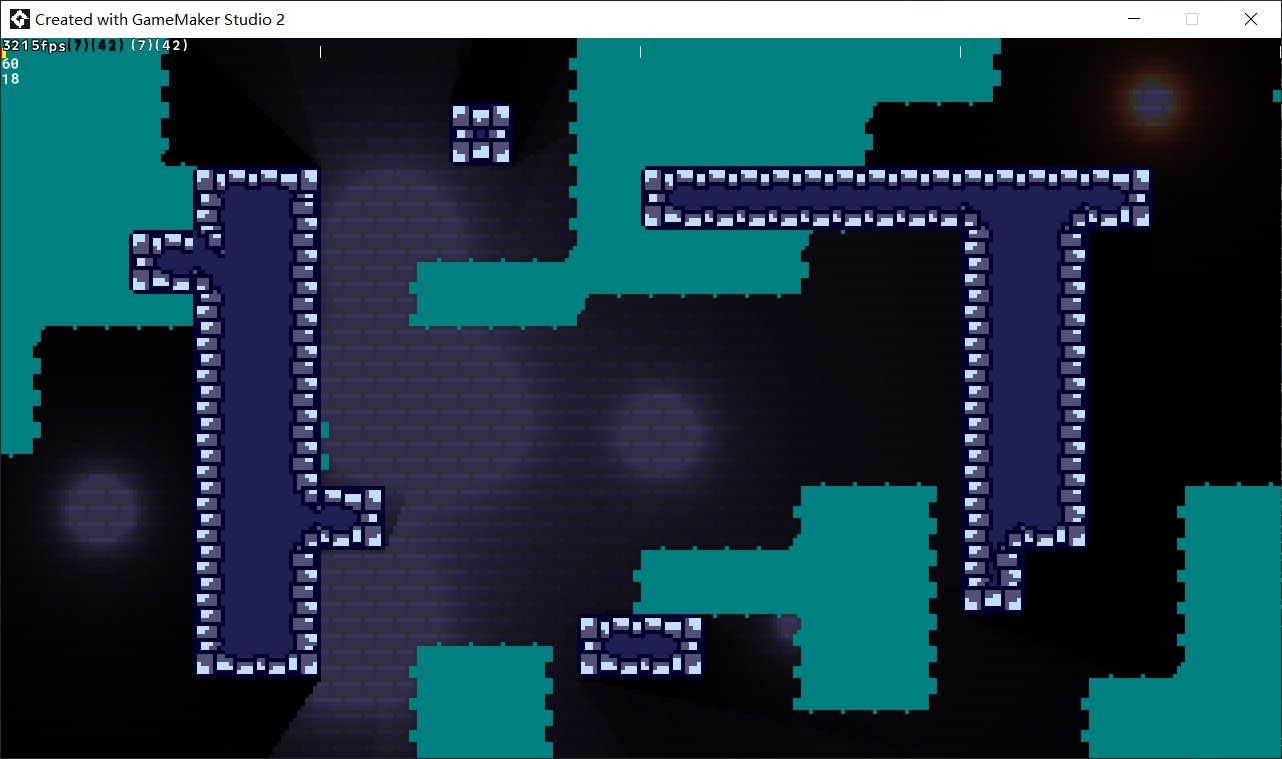
七、应用到我的项目